Karanyi Sounds Cloudmax Breeze

Software Review

Plugin for our most beautiful vocal recordings

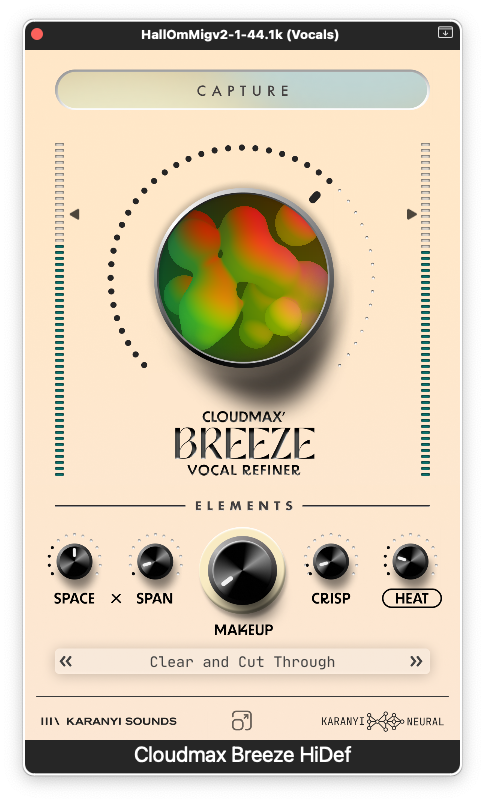
At the end of last year, Karanyi Sounds released a piece of software which, according to the developer, should be able to revolutionize the mixing of song recordings, and this with the help of AI. It is clear that a buzzword like AI makes us both a little extra curious and also a little suspicious.

Artificial Intelligence

Many people wonder why so much is written about artificial intelligence, and so little about the more natural form of intelligence, you know, the one that borders on the concept of good common sense. It is predicted that the artificial variant is the one that will be able to save the world – or destroy it, depending on who you talk to – and in the context of music technology there are many areas where AI could perhaps be of great use.

However, to be able to compose something with somewhat greater quality than pure elevator music, I think something more is required: human creativity, imagination, inspiration. We leave all that to the human brain, or maybe the heart, but when it comes to the more everyday number crunching where you process a large amount of data in as short a time as possible – what you used to think supercomputers were needed for – there AI can definitely find its place, and also maybe manage it quite well.

Cloudmax Breeze

That’s where Cloudmax Breeze from Karanyi Sounds comes in. With just a few controls – and with the help of AI – you can create a really professional vocal sound in a snap. Instead of needing separate plugins for EQ, reverb, compression and saturation when it’s time to mix your vocal tracks, Cloudmax Breeze has combined all of this into one and the same easy-to-use plugin. Yes, it has been done before, but without AI involvement and perhaps not very often with such good results.

As far as the AI ​​bit is concerned, you find it primarily in the function that the developers named Capture. With the help of this function, Cloudmax Breeze collects a lot of information about your vocal track and analyzes it in terms of characteristics such as mood, style and tempo. And this only takes a few seconds.

Cloudmax Breeze then presents a suggestion for settings for reverb and other effects that it thinks should be suitable for your particular vocal track. Something that the developers call the Karanyi Neural System listens to several different characteristics of your vocal track. It looks at how rhythmic and transient-rich the song is. It also checks the frequency content; both where it is most emphasized and how wide the frequency range is. It then sets parameters such as the reverb’s size, damping, as well as diffusion so that it fits optimally to your vocal track.

Using the Capture function, your vocal tracks are analyzed.
An orange light shows that something exciting is happening.

Knobs and faders

Once the AI ​​algorithms have done their thing, you still have a number of parametersyou could fine-tune the effects with. A large knob, Breeze Control, gives you the overall editing options – there you adjust the total amount of effect – but you also have a set of smaller knobs for fine-tuning.

For the reverb you have Space, which controls the total amount of reverb, plus Span to change the feedback of the reverb tail.

The Makeup knob combines a certain amount of compression while at the same time compensating for changes in the sound level. Crisp controls the amount of treble content and there you can increase the clarity of the vocals, but you can also add a certain airiness to vocal tracks that can otherwise feel a bit wooly.

The next knob, Heat, also uses the developers’ own Neural System. This time it’s adding so-called vintage warmth, or as we used to say, distortion, in different forms and amounts. Heat can provide both a certain warmth, but also distortion that mimics the one we get from tube-powered machines such as mic preamps, or the tape saturation we got from our beloved tape machines. This function also has an on/off function if you prefer the sound as it is.

You can also adjust both input and output signals with sliders on the left and right edges of the app window.

There are also a bunch of presets that you can use as a starting point, and you can also scale the interface up to 150 percent if you think the app is too small för a high-resolution screen.

Of course, Cloudmax Breeze also offers a number of ready-made presets that you can use as a starting point.

The various effects

The four effects units included in the Cloudmax Breeze may not be that remarkable in themselves. It is more the combination of them and the ability to quickly dial in a really professional vocal sound that is the Cloudmax Breeze’s biggest advantage. With the reverb included, you can create the illusion of everything from small intimate rooms to really large halls, or even hangar buildings if that’s what you’re looking for.

Crisp works great if you need to sharpen a vocal track that feels a bit bland. And the ability to add some warmth with Heat partly takes care of the other end of the frequency spectrum.

Makeup is something of an all-encompassing compressor section that works really well on most vocals. Sure, you don’t have the option to fine-tune attack and release down to the smallest decibel level, but if that’s what you’re looking for, you should probably choose a different plug-in from the start. Cloudmax Breeze is for those who want to quickly be able to create a usable vocal sound, and it actually does this beyond expectations.

Who could benefit from Cloudmax Breeze, you might wonder?

The developers claim that it is perfect for all types of vocals, and they mention as examples the professional studio that quickly needs to find good vocal sounds for several different vocalists, or beat-makers and singer-songwriters where you also need to quickly and smoothly create a nice vocal sound for, for example, a demo recording.

I tested the plug-in on various clean vocal tracks where I had previously tried to get a nice vocal sound, and I must admit that it worked really well with the suggestions I got from Cloudmax Breezer’s Capture function – if anything, I perhaps felt that it was a little too generous with the reverb in some cases, but this was very easily fixed. Furthermore, I also tested some tracks where I hade unmixed the vocals using Logic Pro’s Stem Separation function from a previously downmixed stereo audio file. These tracks contained some artifacts and oddities from the start, but I found that Cloudmax Breeze did a really good job of smoothing them out. The end result was clearly better than I had expected, especailly considering the source material.

Conclusion

If we were to try to sum this up with a few well-chosen words, the first two would be fast and easy to work with. Then we actually have to add the fact that the end result sounds really good, especially if you think about the areas of use that the developer has indicated. I really love plugins that are primarily intended to make things easier for the user. In my case, the user was a songwriter who wanted to quickly get a nice and usable vocal sound without having to tinker with a lot of different plugin effects, and in exactly such a situation, Cloudmax Breeze works perfectly. Price-wise, it is also very good for my type of user. Right now, just under 50 dollars feels undeniably very affordable.

System Requirements

  • Windows 8 or higher is recommended
  • At least 4 GB of RAM, 8 GB is recommended
  • 2 GHz CPU with at least 4 cores
  • A VST3/AU/AAX compatible 64 bit host (DAW)
  • 200 MB free disk space

Available Formats

  • Mac OS: AU, VST3 (64-bit)
  • Windows: VST3, AAX (64-bit)
  • Runs in any major VST/AU/AAX compatible DAW except: Maschine which is NOT supported.
  • Tested stable versions: Ableton Live 11.3.4, Logic Pro 10.7.4, Reaper 6.8

Link: 

Developer Karanyi Sounds

Info www.karanyisounds.com

Price 73:75 dollar; just nu 48:75 dollar

HOFA Colour Delay

Software Review

All these iconic delay sounds

There are good and interesting delay plugins. And then there are those that are slightly better… and then there’s the German developers HOFA’s Color Delay. This delay is almost in a class of its own. Four different types of delay effects have been incorporated into one and the same plugin. But the developers didn’t stop there. Color Delay has also been equipped with a lot of extra effects and other functions, which make it a very useful plugin. We take a closer look…

Even before we started listening to it, we knew there was something special about this delay. The four different delay effects, Tape, Bucket Brigade, Digital and Destruction, can be used in any order and in any combination you want. In addition, you have access to effects such as Diffusion, Phasing, Chorus, Ducking and Auto-pan. But let’s start from the beginning.

Installation using the HOFA Plugins Manager

From the developers’ website we download the HOFA Plugins Manager. With the help of this app, we can download, install, and then also authorize or license the software. You don’t need a special dongle for this, but if you need to be able to move the two licenses offered between different machines that may not have access to the web, you can place the licenses on a USB stick or similar. This way you can use your two licenses on two different computers and run them at the same time. This can be a desktop computer and a laptop, or a Mac and a PC, for those who feel like it.

Of course, there is support for all known plugin formats and DAW programs, and you can also test HOFA Colour Delay by downloading a trial version that lasts for 14 days. Should these 14 days not be enough, surely HOFA will also be generous with extending them if you contact their support.

HOFA Colour Delay

There are those who have pointed out that the name may not be very original – for example, there is already a BBD-based delay from u-he called Colour Copy – but still … it has to be called something. And if the name doesn’t get that many extra plus points, I still have to award quite a few points for just about everything else related to the HOFA Color Delay. But let’s take a look at what this plugin can do with an audio signal that needs that little bit extra.

As we mentioned earlier, HOFA Colour Delay offers no less than four different types of delay effects, and you can run all four at the same time. The different delay types are Tape, Bucket Brigade, Digital and Destruction, and of course you choose how many of these different variants you want to use and in what order. Just drag and drop them in the order you prefer. The delay effects are all of such high quality that each one can absolutely stand on its own, but when you combine a couple of them (or more) you can create some really amazing sound effects. And when it comes to effects, you can also add some to the delay, if you think it’s needed. Here too, the range is really generous. Or how about diffusion, phaser, chorus, auto pan and ducker?

Four types of Delay

Tape: This is a delay effect that emulates the old, trusted tape echo from the childhood of rock music. Here you can create just the right amount of tape compression for a truly successful nostalgia trip. Warmth, saturation and all the other artifacts that make tape so beloved today are here in abundance.

Bucket Brigade: This also has a really old pedigree, and there are plenty of lo-fi artifacts here. Bucket Brigade Delay is based on an old analog delay technology where an audio signal was sent into an IC circuit with a chain of capacitors. When the first capacitor is filled, the signal is sent on to the next one, and then to the next; one step for each clock cycle. This way you get a certain delay of the signal. At the same time, both the input and output signals are low-pass filtered in a BBD unit, and this, together with some other artifacts from the system, gives it a typical lo-fi sound, especially compared to modern digital delay units. Bucket Brigade Device refers to the old-fashioned chain of buckets filled with water that firefighters often had to use to fight fires in the past.

Digital: Even digital delay devices have their faults and shortcomings to a certain degree, depending on their design. Here there are effects such as aliasing and quantization distortion, which are due to low sampling frequencies and bit depths. This effect aims to emulate the early digital delay units which had an abundance of just such flaws.

Destruction: Here we are talking about real digital shortcomings, saturated sound and tube distortion – at its best/worst. As the name suggests, there are possibilities here for many forms of sonic destruction. Analog warmth in the form of tube distortion, sound that clips – you name it! Room for experimentation.

Here we use all four different delays to create a really strange sound.

The Graphical User Interface – the GUI

You can actually access all the settings in one and the same window, and most things feel very intuitive and easy to understand. Centrally located in this window, the delays are displayed graphically as bars, along with waveforms of the sound passing through. Modulation results in “fuzzy” bars. Below this image is a diagram that shows frequency content along with a very useful EQ section. Everything is very interactive.

You will find the delays in the upper part of the window. Each delay has its own controls. Tape has knobs for Drive and Wow & Flutter. Bucket Brigade has different types of BBD effects (Standard, Vintage, and so on), as well as a knob for Noise. Digital has knobs for sample rate reduction (lovely word!) and bit depth, and finally, with Destruction, you can control the amount of Tube (distortion) and Clip.

Below this, you can control the amount of Delay, Feedback and Modulation, and also sync the effect to your DAW’s own tempo. There’s also a Tap function, where you physically tap the tempo you want on the delay. You can also choose from a variety of ping-pong effects here, where the echo bounces back and forth between the left and the right channels.

Of course, there are lots of interesting presets in HOFA Colour Delay.

Five post-delay-effects

In addition, you have access to five different specially designed effects to add after the delay.

  • Diffusion: Here you can create a dense sound structure with small reverb-like modulations – perfect for creating atmospheric soundscapes.
  • Phaser:This is a classic delay effect that can create a modulated movement and a more dynamic sound. Perfect for more rhythmic sounds.
  • Chorus: Another classic effect which creates a bigger stereo image using small pitch modulations. Works great on chords as well as solo parts.
  • Auto Pan: This creates a moving stereo image that floats between the left and the right channel – especially illusory when listening through headphones.
  • Ducker: We also have a ducker function that allows us to avoid drowning the original signal in echoes and delays. The ducker brings out the delay effects in pauses between different vocal or instrument phrases, and suppresses the effect when it risks clashing with what might be more important.

Even with these post-effects we have controls to fine-tune the different parameters, and in some cases – that is the diffusion and the phaser – you can also choose between different types of effects within the same genre. And here too, you can use the drag-and-drop method to decide in which order the various effects should be placed. The algorithms for these effects are claimed to be developed to work optimally with delay effects, and there is nothing to suggest otherwise. It all sounds absolutely amazing!

As an extra aid, you can get an explanatory text for the effect you have chosen.

Conclusion

It’s always fun to test effects plugins that shows that someone has clearly thought outside the narrow framework that developers – especially in previous years – have felt compelled to adhere to. A delay plugin can be so much more than just a delay. HOFA Colour Delay shows this with all the desired clarity. Here we are offered a lot of possibilities to manipulate the sound effects in exactly the direction we want – and then a little further into the unknown.

Four different delay types that we can combine in exactly the order we want, combined with a range of great-sounding and hand-picked special effects… This means a completely veritable smorgasbord of exciting and imaginative delay effects.

The fact that they the developers have focused a little extra on warm, vintage-like sound effects is of course not something we feel sorry about. On the contrary, we get just as warm inside as the many wonderful sounds we can create with HOFA Colour Delay.

We definitely don’t miss the squeaky clean, but oh so sterile and emotionless digital effects that we have been fed for many years. This is exactly how we want it to sound! A big thank you to all the developers at HOFA!

LINK

Here is a brief overview of how HOFA Colour Delay works:

SYSTEM REQUIREMENTS

  • Windows: Windows 7 or later
  • Mac: OS X 10.13 up to macOS 14 (Sonoma), Intel (64 Bit) or Apple Silicon

DEVELOPER HOFA Plugins

INFO hofa-plugins.de/en/plugins/colour-delay

PRICE Now: 103,99 euro; Normal price: 114,49 euro

HOFA Plugins IQ-Series Reverb V2

Software Review

Best of them all?

At the end of the era that was the heyday of the Swedish Musikermagasinet, more precisely issues 6 and 7 from 2023, we did a fairly extensive review of all the reverb plugins that we liked the most. It turned out to be a big pile, I think we landed on a total of 35 different plugins, but we missed one of the very best and it’s time to remedy that now. That’s why today we’re looking at the HOFA Plugins IQ-Series Reverb V2.

The German company HOFA has many legs to stand on. They run extensive online education, they have a mixing and mastering studio, but above all… They also develop damn good audio plugins. Not so long ago they released an absolutely wonderful delay plugin, HOFA Colour Delay (there will be a review shortly on this website), and they have an equally wonderful reverb plugin that has now reached version 2: HOFA Plugins IQ-Series Reverb V2.

HOFA Plugins IQ-Series Reverb V2

Released back in 2014, the first version of the extensive IQ-Series convolution-based Reverb plugin featured a solid collection of rich-sounding impulse responses from far and wide. But IQ-Series Reverb had so much more to offer. Not only had they stuffed an algorithm-based reverb sound engine into the package as well, but it also offered a lot of other features that made the reverb one of the most flexible on the market.

When IQ-Series Reverb V2 was released, a number of further improvements were made to an already excellent reverb plugin. You still have all the possibilities to affect the impulse responses in all sorts of useful ways; you can time-stretch or compress them, they can be gated, you can split them and edit the early reflections and the reverb tail in different ways. And of course, you still have “the Positioner” which allows you to place the sound source wherever you want in the stereo image.

The Positioner lets you place your sound-source wherever you want in the stereo image..

The browser part, where you can search among the almost 3,000 impulse responses (the standard version comes with almost 1,500 IRs), has received a major update, and above all, you can now unhook it from the other part of the GUI, and then enlarge both parts completely independently of each other. The searchability is absolutely excellent. You can search by area of ​​application, type of reverb (plate, hall, etc), dark or light sound character, and so on, and when it comes to what the developers call Global Presets, they can now contain several different reverb variants – previously there was only one.

Outstanding versatility

A reverb preset from the IQ-Series Reverb V2 can actually contain up to four different convolution-based reverb effects plus two algorithmic reverbs at the same time! Talk about creating interesting acoustic environments. To balance its different reverb types in the same preset, you also have access to a mixer section with separate faders for all included reverb effects plus a master fader for the entire mix. There you can also place each included reverb part wherever you want in a 5.1 surround perspective. Oh, what joy!

In the mixer you can decide how much of each reverb-part you want to use, and also mix for 5.1 Surround. 

When it comes to the separate reverb sections, there are also plenty of settings. What about Reverb Time, Dir/Early Tail, EQ, IR Envelope, IR Cut, Modulation, Positioner, Saturator, Compressor and Gate – on the input side alone. On the output side, in addition to Saturator, Gate and EQ – there is also an excellent Ducking function. Almost overwhelming!

A nice Ducker might always come in handy!

But it never becomes difficult to understand how to handle the different parts or effects, because the graphical interface contains so many easy-to-understand parts, and the entire operation feels almost self-explanatory.

In the main window, you can twist and turn a waterfall diagram that symbolizes your chosen impulse response, and when you select an effect or adjustment function, it automatically appears in the large window. Very educational!

A Saturator (some might call it distortion) is another good option for affecting the reverb sound..

Installation with HOFA Plugins Manager

The installation is done using HOFA Plugins Manager, which can be downloaded from the developers’ website. This software also handles the authorization of all HOFA plugins. So you don’t need a separate dongle or similar. However, you can put your license on a USB stick if you prefer this, or if your computer does not have constant access to the internet. You get two licenses so you can have access to your effects on, for example, a desktop and a laptop at the same time, and of course you have support for all known plugin formats and DAW programs. In addition to the around 1500 impulse responses included in the basic set, you can buy new IRs in different packages. In total, HOFA offers 2,886 different impulse responses for the reverb-hungry. You can also test IQ-Series Reverb V2 by downloading a trial version that lasts for 14 days. Should these 14 days not be enough, HOFa I’ve heard rumours that HOFA might be generous in extending them, if you just contact their support.

The HOFA Plugin Manager lets you install all the parts of the reverb as well as licensing it..

Lasting impression

As for the sonic impression of the HOFA Plugins IQ-Series Reverb V2, this is of course very interesting, but at the same time you have to keep in mind that all such things are often a matter of personal preference. After all, there is a lot that can be accommodated within the concept of taste. For my own personal part, however, I have to state that I would like to place this reverb plug-in among the ones I appreciate the most in all categories. The basic sounds are absolutely excellent, but then you can also adjust them to the exact sound you want. If you then combine a few different reverb instances of different nature in one and the same effect, you can really create the most interesting sounds.

The range of impulse response is absolutely outstanding, and the algorithm-based effects sound really good too. And together… Wow!

HOFA IQ-series reverb V2 offers full 5.1 Surround support, lots of extra effects as aids, ready-made reverbs such as Room, Ambience, Chamber, Hall, Church, Plate, Space, Spring, FX, Reverse, Hybrid and Cabinet – I was more than a little extra delighted with the smallest rooms; it really felt like you were in the room.

What would a pro-reverb be without a reverse effect?. This one sounds excellent!

One could argue that the price of the Basic Version of the IQ-Series Reverb with its 1,500 different impulse responses is on the higher side at 262.50 euros, but if you consider what you get for that kind of money, it actually feels really affordable. If it then turns out that the HOFA IQ-Series Reverb v.2 is the reverb you use the most (or maybe exclusively), then maybe we can even talk about a bargain price. But download the trial version and test it for yourself! I don’t think you’ll be disappointed. I definitely wasn’t.

Link

Here are some of the highlights from the HOFA IQ-Series Reverb V2:

System Requirements

Windows: Windows 7 or later
Mac: OS X 10.13 up to macOS 14 (Sonoma), Intel (64 Bit) or Apple Silicon

DEVELOPER HOFA Plugins
INFO www.hofa-plugins.de
PRICE IQ-Series Reverb V2 Basic version: 262:50 euro; extra IR-packs 49:50 euro/each; IQ-Series Reverb V2 med 8 IR-packs: Just nu: 335:09 euro