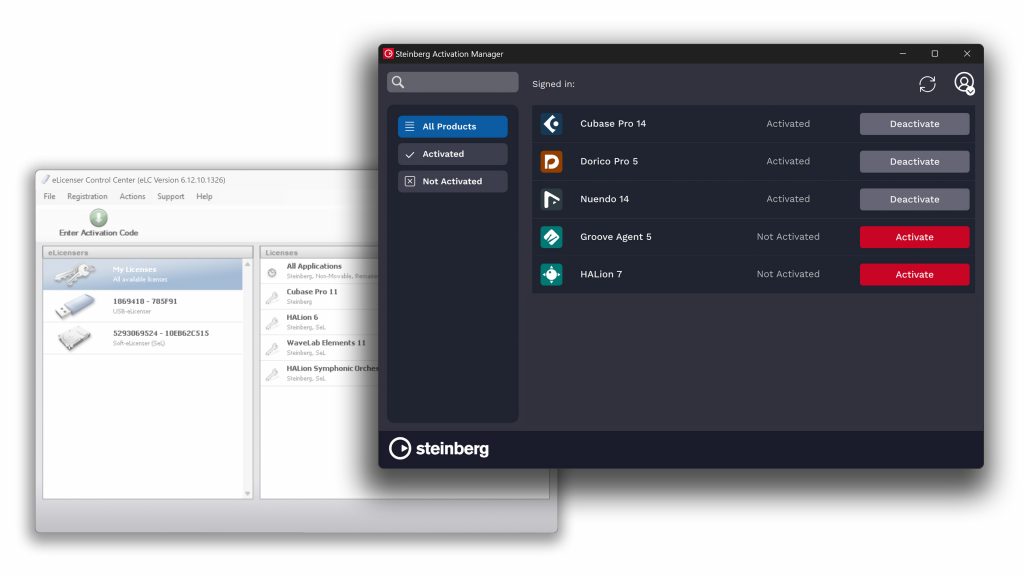
Steinberg’s software now fully relies on Steinberg Licensing and announces the end of the eLicenser service on May 20, 2025.
HAMBURG, Germany — Steinberg has announced that, following the gradual changeover to the new, software-based Steinberg Licensing license management system, the previous eLicenser system will be switched off on May 20, 2025.
Customers whose software require Steinberg Licensing are already enjoying the benefits that this new system offers, such as a simplified license activation as well as allowing a single-user license to run on up to three computers without the physical USB-eLicenser dongle.
Giving customers this extra freedom and flexibility, the changeover to the new ID-based Steinberg Licensing system has been in progress since 2022, with various options and offers provided to transition seamlessly from eLicenser-based products to the new system.
Following the close down, the company will continue to ensure that customers are able to update or upgrade eLicenser-based products as long as the eLicenser has been registered accordingly. Existing eLicenser-based products can still be used without limitations, as long as the licenses are available on the USB-eLicenser or Soft-eLicenser.
Managing Director Clyde Sendke commented: “Over several years we have kept our customers posted through the various avenues available to us on the development of a new licensing system. After successfully rolling out our new license system, the time is gradually drawing closer to call an end to the transitional phase from the old eLicenser to the new Steinberg Licensing system.”
For further information and FAQs regarding the end of the eLicenser system, please visit
A problem that often arises when doing different vocal overdubs is getting the vocals tight enough. Not everyone is as good as Swedish Robyn at this; she can apparently add as many overdubs as she wants, and everything sounds absolutely super-tight. The rest of us either have to sit and edit the vocal tracks by hand, or use some kind of app that fixes this. One such app is the new Sync Vx from Waves Audio.
The advantage with using Auto Align apps is that they should be able to listen to a master or reference track that can act as a template, and then the app takes over and – with the help of time-stretching and other useful algorithms – makes sure that all the other tracks follow the master track exactly in sync.
Clearly the development has gone incredibly fast since I last looked at one of these programs. If I remember correctly, it was VocAlign Pro from SynchroArts that was on the test bench at the time. Now Waves Audio has come up with an app that promises to do all this work both faster and smoother than many of its competitors. Obviously you get incredibly curious.
ARA- and Align-plugins
Many of the apps of this type that we have looked at over the years have been quite complicated to handle but at the same time have given really good results. Others have been fairly easy to handle, but then often have been a bit disappointing result-wise. Waves Sync Vx is promised as the golden shortcut; it is said to be both easy to handle and to give excellent results. Is it really possible?
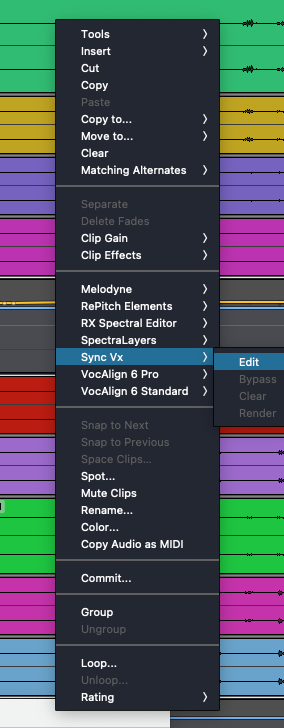
To start with… Sync Vx is a so-called ARA2 plug-in (Audio Random Access) and in many DAW programs these work very well, although it can be a bit tricky to add them to one (or more) tracks. In Studio One, Cubase and Nuendo you open an Extension or Event Editor. In Reaper you find it under FX. In Pro Tools it works best if you first select the tracks or clips you want to tighten and then right-click and select Sync Vx from the menu that appears.
By right-clicking on any of the selected tracks in Pro Tools, you can select Sync-Vx-Edit to open the app.
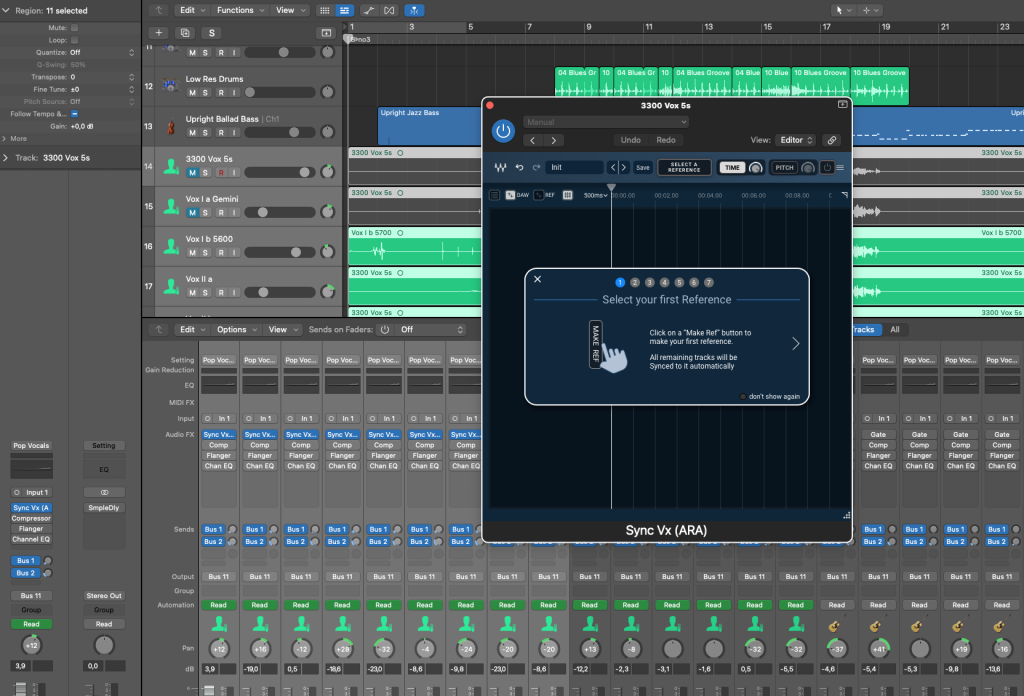
In Logic, if you have one of the newer Silicone machines (M1, M2 etc), you simply have to restart the program under Rosetta, the add-on that also handles older plug-ins and programs that otherwise cannot run with Apple’s new processor. It is of course a bit akward that Apple has not managed to add support for ARA to its otherwise miraculously powerful Silicone machines, but we can only hope that the developers at Apple will fix this soon.
Logic must be opened under Rosetta to be able to use ARA plugins.
Anyway, once you have Logic up and running under Rosetta, you also have to make sure that the ARA plug-in is first in the chain of insert plugins on each track, otherwise it won’t work. Unfortunately there are some DAW programs that don’t yet support ARA plugins (no one mentioned…), but hopefully we’ll soon have these on board too.
Waves Sync Vx
The developers emphasize the benefits of working with an Align app, especially when compared to the time-consuming editing work required if you were to do all the work that Sync Vx does in a blink of an eye on a completely manual basis. It can be used to tighten up background choirs, make nice doublings of solo vocals, and much more. Yes, it works perfectly even if you want to tackle multi-tracked guitar parts a’ la Brian May, for example; or why not try it on a brass section? Programs like Waves Sync Vx can also be invaluable for post-production for films or TV shows, when you need to sync up dialogue, for example.
You add Sync Vx to allt the tracks that you want to sync and, depending on which DAW you use, it behaves a little differently. Check what applies to your own DAW; it may need to be upgdated. Also keep in mind that ARA plug-ins should not be opened as a regular plug-in and added as an insert, the exception is Logic Pro (as we mentioned above) but there you should get the choice between a regular native plug-in and the ARA version).
Waves Sync Vx handles a maximum of 16 tracks at a time.
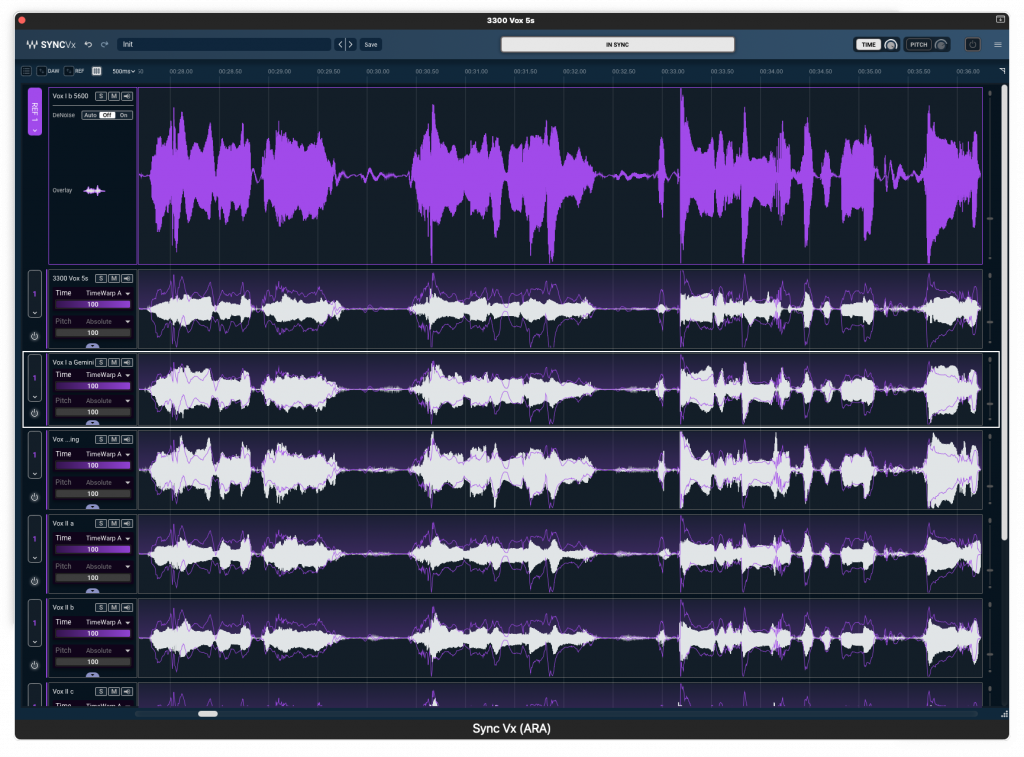
When everything is in place, the ARA plug-in opens in a separate window and there you will find all the tracks that you want to sync. However, Sync Vx “only” handles up to 16 tracks at a time. If you have more tracks, you can divide them and take a few at a time.
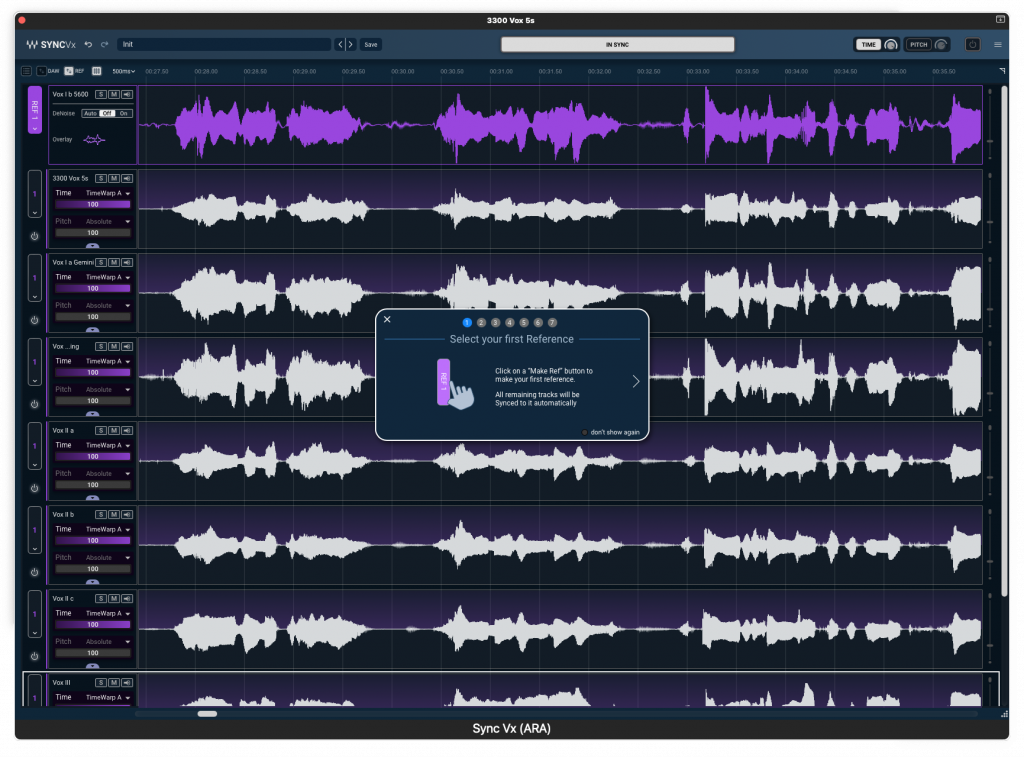
The first time you use Sync Vx, a “Setup Wizard” opens up, giving you some instructions on how to handle all of this. You are asked to choose which track the others should be synced to. The developers call this the Reference Track, and you can select up to four different reference tracks in a Sync Vx window. You then decide which of the other tracks should follow your chosen reference track. This way, you can easily handle, for example, a background choir that sings a little differently compared to your lead voice.
Handling and end result
As soon as you open a Sync Vx window with a bunch of audio tracks, the app starts analyzing the tracks. Depending on how long and how many the tracks are, this takes a slightly different amount of time, but compared to the time you save if you were to do a completely manual editing, that time is completely negligible. When the analysis is complete and you have selected your reference and the tracks that will follow it, this is it. Most of the time it sounds absolutely fantastic, but you also have the option to go in and adjust the result in terms of both sync and pitch, to your liking, from 0 to 100 percent. You can also mark parts of a reference track if it contains, for example, a bit of ad lib singing, “wailing” or the like, which should not be synced to anything else, and tell the app to ignore this marked section.
Here we can adjust Time and Pitch individually on a track.
Sync Vx also gives you the option to fine-tune parts of clips; if you select a part of the clip, you will get adjustment options at the ends of the selected part. At the far left you can decide how much the timing and/or pitch should be adjusted, and at the other end you will see the corresponding controls for transpose and formant. This can of course be extremely useful in a variety of situations.
You can also add so-called Sync Markers, if you have a section that is difficult to sync automatically. A sync marker appears as a yellow line, and if you drag this line, you can manually move, for example, a transient in a word so that it lines up exactly as you want it. To prevent Sync Vx from having to time-stretch the selected clip too much at a single point, the app itself selects a larger area that follows when you move the sync marker. Extremely clever! If you have questions about how all this should be done, there is a very comprehensible and useful manual on Wave’s website.
Of course, you can adjust the vertical scale of the waveforms in Sync Vx, and also zoom in or out.
Conclusion
This makes me so darn happy! No more cutting and pasting in audio files. Well, that’s what the developers promise when it comes to Sync Vx. In a few seconds, the plug-in should be able to create really tight vocals based on your vocal overdubs, and that applies to both sync and pitch, according to the creators.
When all is said and done, it might take a little more than a few seconds, especially if there are longer audio files that the program has to analyze first. But Sync Vx works incredibly smoothly, and the end result is absolutely excellent. The only thing that can be a bit tricky is getting the respective DAW program to accept Sync Vx as an ARA plug-in, but this is definitely not the Waves developers’ fault. Rather, the various developers at Apple, Avid, and others have to take care of this.
Of all the plugins of this type that I have reviewd over the years, Sync Vx is undeniably the most intuitive and easy to work with. And the end result is absolutely top-notch! Five stars in my book! I can imagine that dialogue creation and similar syncing in a post production situation could be made a lot easier with Sync Vx. This is something we’ve all been dying to see!
Link
Here is an educational video showing how to handle Sync Vx:
Here you can hear Waves Sync Vx in action. I used a on dozen different vocal tracks for this one:
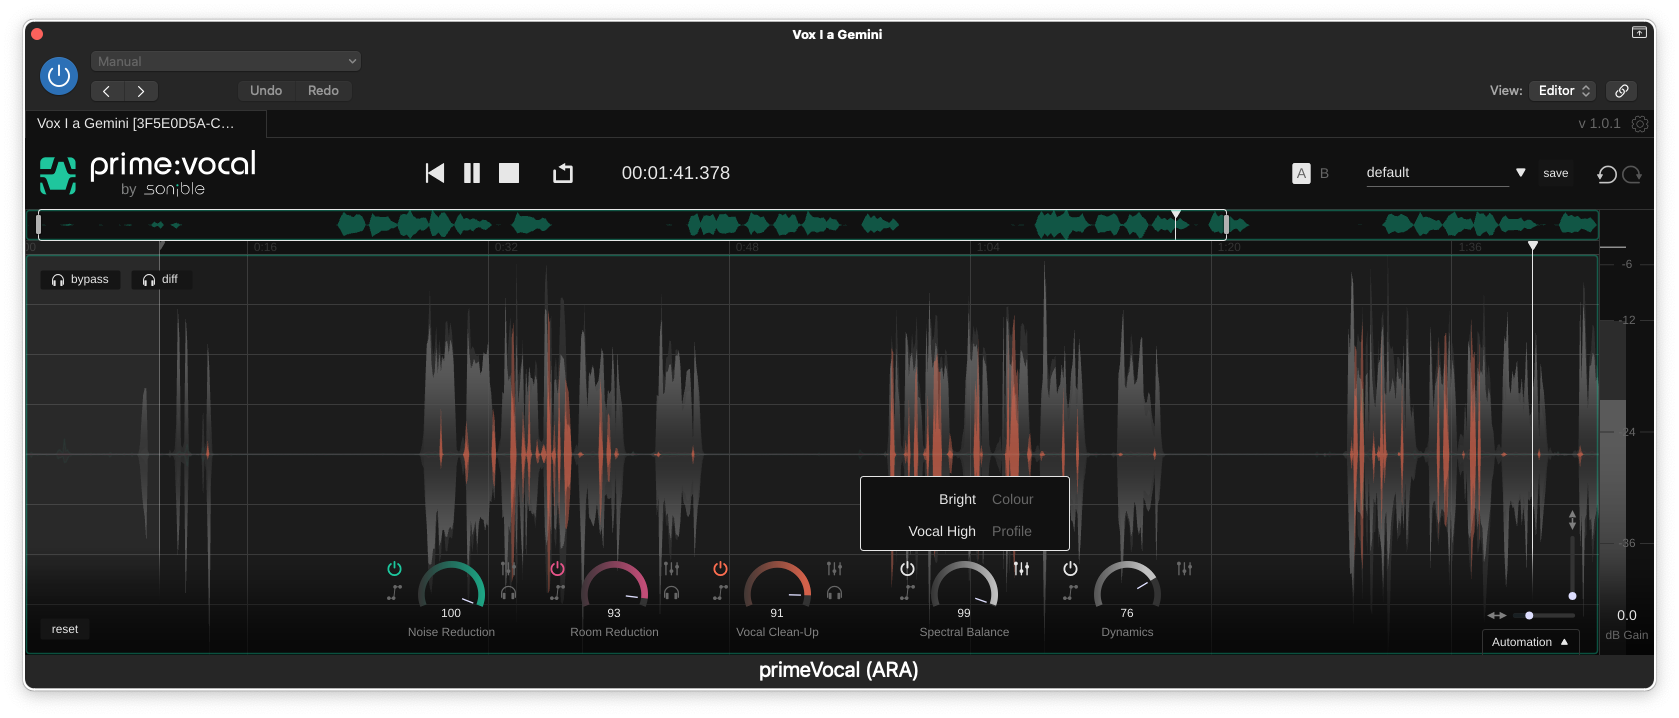
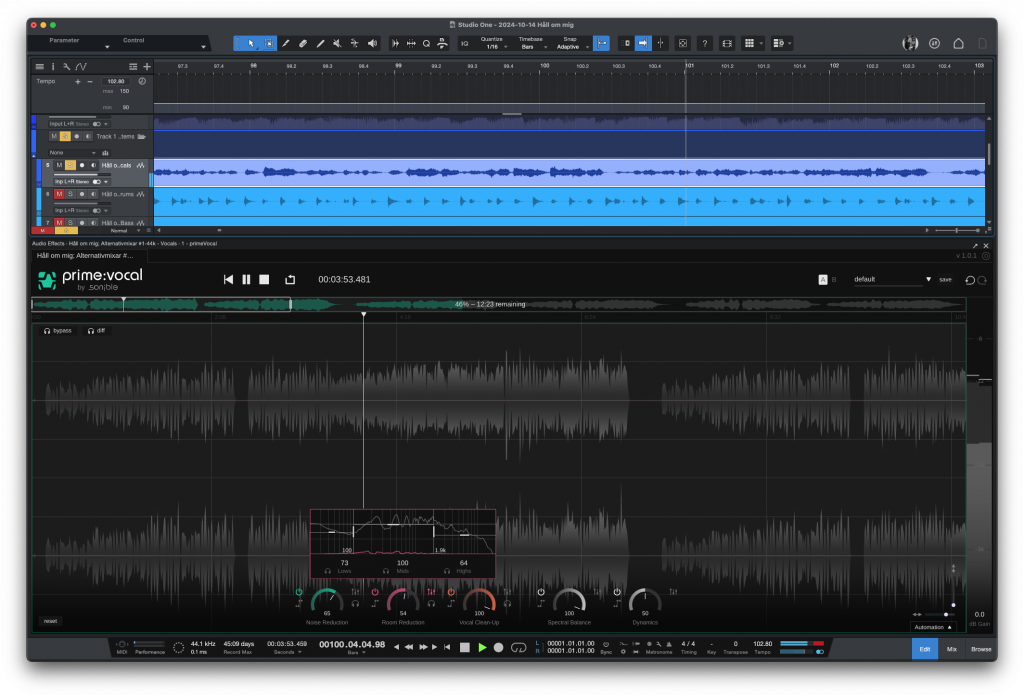
A few days ago I published a review of an interesting plugin from Karanyi Sounds, the Cloudmax Breezer. It was a software that promiesd to fix vocal recordings so they could sound a little more professional. At the same time, a software appeared from another place in Europe. From German company sonible came prime:vocal, which is a continuation of the theme of “simple software that fixes most things almost on its own” … with just a little help from AI (yes, there we have this buzzword again). Today we focus on sonible prime:vocal.
Here we find the tools that can be used to further enhance a recording. Vocal Clean-up can be used to remove annoying S- and P-sounds (like in puff-sounds).
The great thing about sonible’s various software is that they can often, with very little effort, make a huge difference to the end result. Previously, we have looked at reverb, EQ plugins, compressors and limiters from the diligent developers at sonible. Prime:vocal, as you all probably already understood, handles various vocal recordings on a more general level.
sonible prime:vocal
The developers promise that this plug-in will allow you to create world-class vocal recordings, regardless of your recording environment.
They say AI has been used to accomplish this. The AI technology analyzes the recorded sound and removes things that should not be heard on a vocal recording – a bit like what was done on John Lennon’s old demo recordings – and only beautiful vocals remain (yes, of course, that assumes that there is one from the beginning). Sonible prime:vocal also offers a number of other controls with which you can improve your recorded vocal performance.
The thing is that most people who have a project or home studio and want to record a song don’t have access to a perfectly adapted and tuned vocal booth. The result from a vocal recording is often slightly colored by the acoustic environment in which you find yourself. It can be disturbances from the outside in the form of hum and other noise, but even more often you can hear strange resonances from the room. It could be anything from a reverb effect that originates from standing waves in the room, but it could also be that the room itself amplifies certain frequencies and creates resonances in an undesirable way. All of these are of course quirks that you would rather not have, but once they have ended up on a vocal track, it can be difficult to get rid of them. Until now, says sonible…
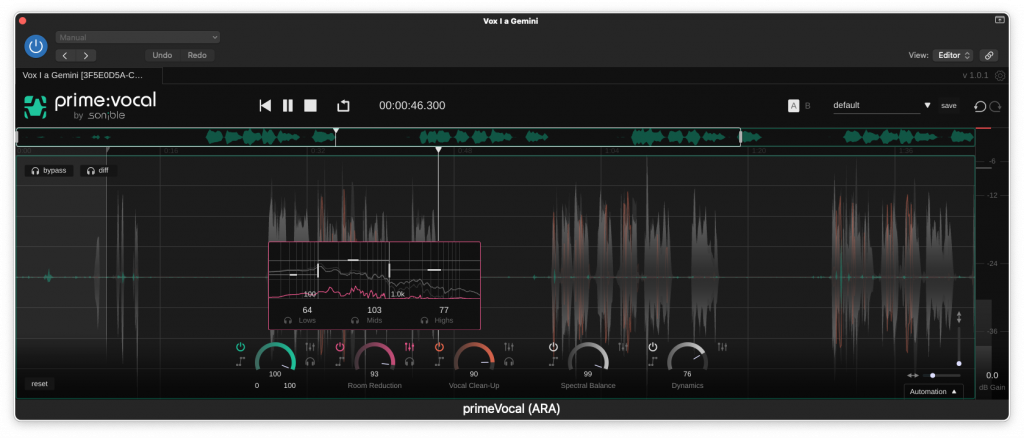
With Room Reduction, you can reduce the room’s impact on the recording, for example a bathroom echo.
Several audio tools
Sonible prime:vocal has various tools that are intended to, if not eliminate, then at least reduce the impact of these effects on your recorded vocals. After the built-in AI algorithms have analyzed your audio recording, the app comes up with a suggestion for how it could sound. But the developers at sonible are not satisfied with this. They also have no less than five different special tools at their disposal to further fine-tune the sound.
Noise Reduction, Room Reduction and Vocal Clean-up are designed to address different aspects of this acoustic problem. Noise Reduction is designed to remove additional unwanted acoustic phenomena such as background noise, hum and crosstalk, Room Reduction is designed to tone down the room’s influence on your recording (reverbs, resonances, standing waves, etc.), and Vocal Clean-up is designed to handle sharp and disruptive consonants such as S, P (as in puff sounds) and the like.
But it doesn’t stop there. A dial for the so-called spectral balance parameter has also been inserted. They have probably taken a lot of algorithms from the company’s own excellent smart EQ4. With this knob you can control the sound in a brighter or darker direction.
Last in the row of knobs we have dynamics which allows you to control a so-called “level riding” (where you ensure that the sound level is kept at a steady and decent level in three different steps) and compression which can also be set in three different basic levels – in addition to the knob turns of course.
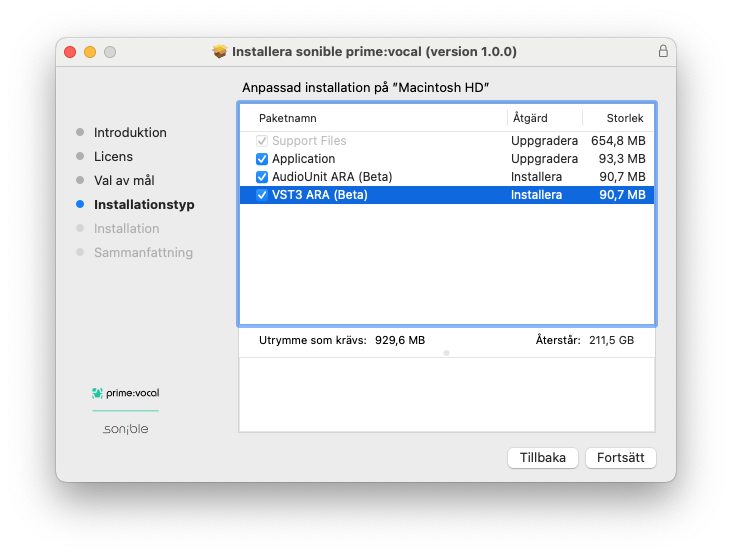
So far prime:vocal’s ARA plugins are still in Beta version. And an AAX version does not exist at all.
So how does it work?
I had very high hopes for sonible prime:vocal – sonible has developed so many excellent pieces of software over the years – but unfortunately I was disappointed by some details of prime:vocal.
On paper, this sounds like an extremely capable and suitable plugin for both home studio geeks who are forced to record their vocals in a room that doesn’t sound quite optimal, and for post-production where a sound engineer may need to fix dialogue that was recorded outside in a messy industrial space, in an office, or similar. There can really be many potential sources of interference that need to be eliminated (I suppose you recogize this).
When it comes to simpler fixes prime:vocal works really well. A vocal recording that has a bit too much natural reverb can be made to sound almost “dead muffled”, and both compression and the spectral balance function are okay. But if we have a really difficult recording with, for example, a motor or a fan that can be heard in the background, or a recording with far too lively acoustics, it immediately becomes much more difficult for prime:vocal. If you try to remove the reverb effect with room reduction from a very lively recording, you either get some funny tail that lingers as a kind of artifact/side effect, or the vocal/speech can instead feel both muffled and cut short. It just doesn’t sound very good.
There are many plugins from other developers that do a better job here. I’m thinking of the Waves Clarity Vx series, where the Pro plugins in particular do a really good job, and Cedar VoiceEX, Hush audio’s Hush and accentize dxRevive, all of which sound a bit better to my ears.
It actually feels as if sonible’s machine learning hasn’t been allowed to listen to really difficult recordings. But you might not want to record dialogue (or vocals) in a noisy workshop to begin with, you might object. Yes, but sometimes you actually have no choice.
Another detail is that prime:vocal for some reason cannot handle recordings longer than 60 minutes. This can be a problem for both dialogue and live recordings.
In both Cubase, Nuendo and Studio One, it is a bit tricky to load plug-ins with ARA support onto a track.
Then I would like prime:vocal to be better integrated into different DAW programs. The choice to release it only as an ARA plug-in and standalone feels very strange. The developers admit that both the AU and VST3 versions with ARA support are still in beta, and there is no native real-time version yet, nor is there AAX for all Pro Tools users.
This means, among other things, that on newer Apple computers, you are forced to start Logic Pro in Rosetta mode, otherwise the program cannot handle plugins with ARA support. This is of course a big problem and something that definitely needs to be addressed by Apple. But now Rosetta mode is what needs to be used, and this means that other functions that need support from the new Apple-developed processors (M1, M2, and so on), such as the excellent Stem separation function, do not work at the same time. Plague or cholera…
When it comes to Steinberg Cubase and Nuendo, you have to open the prime:vocal Extension on a new audio track and then manage it in an Event Editor. A bit cumbersome and rather clumsy, in other words.
In Presonus’s DAW program Studio One, it works the same way (Event Editors), but both here, in Steinberg’s program and in the standalone version of prime:vocal, the analysis of the audio track takes its fair share of time. Other plugins with full ARA support have spoiled us by allowing the plugin to get to work immediately, but that is not the case with prime:vocal. In its stand-alone version, the time for importing and exporting an audio file between prime:vocal and the DAW you use is also added.
Altogether
I have used and also written about several different sonible plugins over the years. All of the ones I have tested in the past have really impressed, so I naturally had really high expectations for prime:vocal as well.
The developers themselves claim that with prime:vocal they present the world’s most advanced processor software for vocal recordings.
The program also includes some special settings for spoken sound or dialogue. It is therefore not surprising that people want to be able to use this plugin both to fix slightly below par vocal recordings and dialogue for film or TV that was recorded under poor acoustic conditions.
If you have vocal recordings where you have a decent sound to begin with, prime:vocal can definitely be of some help, but if it is about really bad acoustic recordings, it doesn’t work quite as good.
The lack of common native versions in AU, VST3 and AAX formats also makes the plugin a more questionable choice. It feels like the development team was forced to rush the release of this software for some reason. It’s a bit telling that the ARA version of both the AU and VST3 versions is still in beta. Sonible prome:vocal shouldn’t have been released in December last year. I’m afraid it’s simply not ready yet.
LINK
System requirements
PC at least Windows 10 (64 bit)
Mac MacOS 11+
RAM at least16 GB
GPU OpenGL Version 3.2+
CPU Intel Core (i5), Apple Silicon
Software formats
Standalone app, ARA VST3 (Beta), ARA AU (Beta)
Supported sampling frequencies
44.1 kHz to 192 kHz
Authorization
Machine based or iLok (dongle or cloud)
Support for Apple Silicon
Native
Developers sonible gmbh Info www.sonible.com/primevocal
At the end of last year, Karanyi Sounds released a piece of software which, according to the developer, should be able to revolutionize the mixing of song recordings, and this with the help of AI. It is clear that a buzzword like AI makes us both a little extra curious and also a little suspicious.
Artificial Intelligence
Many people wonder why so much is written about artificial intelligence, and so little about the more natural form of intelligence, you know, the one that borders on the concept of good common sense. It is predicted that the artificial variant is the one that will be able to save the world – or destroy it, depending on who you talk to – and in the context of music technology there are many areas where AI could perhaps be of great use.
However, to be able to compose something with somewhat greater quality than pure elevator music, I think something more is required: human creativity, imagination, inspiration. We leave all that to the human brain, or maybe the heart, but when it comes to the more everyday number crunching where you process a large amount of data in as short a time as possible – what you used to think supercomputers were needed for – there AI can definitely find its place, and also maybe manage it quite well.
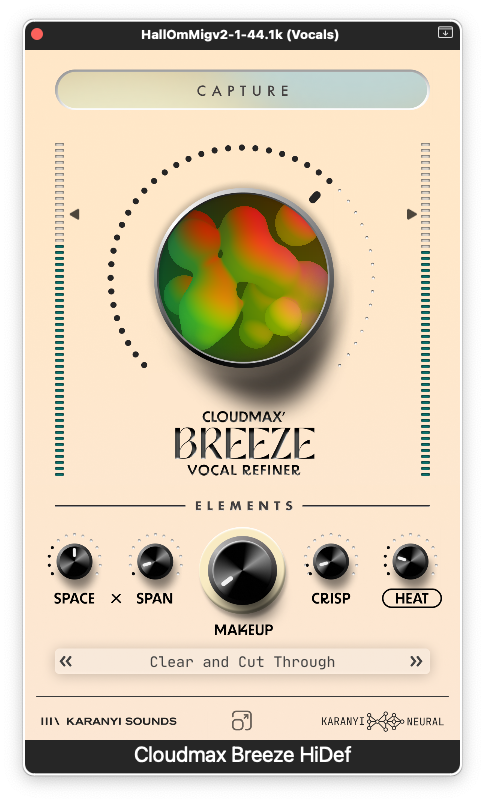
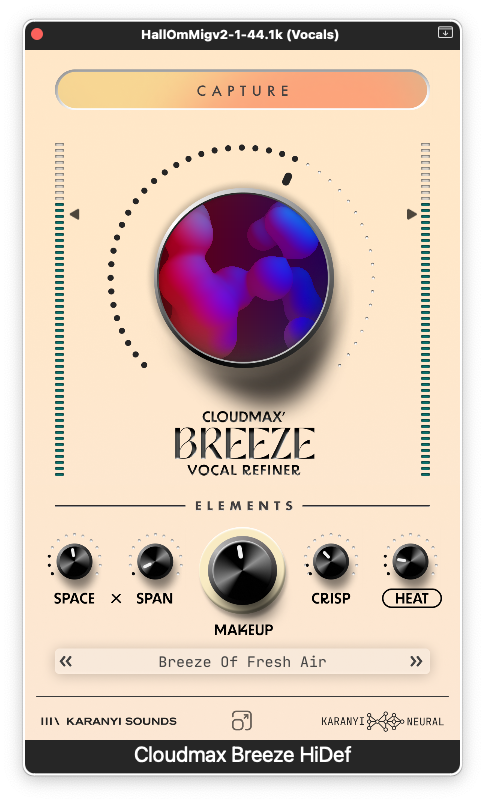
Cloudmax Breeze
That’s where Cloudmax Breeze from Karanyi Sounds comes in. With just a few controls – and with the help of AI – you can create a really professional vocal sound in a snap. Instead of needing separate plugins for EQ, reverb, compression and saturation when it’s time to mix your vocal tracks, Cloudmax Breeze has combined all of this into one and the same easy-to-use plugin. Yes, it has been done before, but without AI involvement and perhaps not very often with such good results.
As far as the AI bit is concerned, you find it primarily in the function that the developers named Capture. With the help of this function, Cloudmax Breeze collects a lot of information about your vocal track and analyzes it in terms of characteristics such as mood, style and tempo. And this only takes a few seconds.
Cloudmax Breeze then presents a suggestion for settings for reverb and other effects that it thinks should be suitable for your particular vocal track. Something that the developers call the Karanyi Neural System listens to several different characteristics of your vocal track. It looks at how rhythmic and transient-rich the song is. It also checks the frequency content; both where it is most emphasized and how wide the frequency range is. It then sets parameters such as the reverb’s size, damping, as well as diffusion so that it fits optimally to your vocal track.
Using the Capture function, your vocal tracks are analyzed. An orange light shows that something exciting is happening.
Knobs and faders
Once the AI algorithms have done their thing, you still have a number of parametersyou could fine-tune the effects with. A large knob, Breeze Control, gives you the overall editing options – there you adjust the total amount of effect – but you also have a set of smaller knobs for fine-tuning.
For the reverb you have Space, which controls the total amount of reverb, plus Span to change the feedback of the reverb tail.
The Makeup knob combines a certain amount of compression while at the same time compensating for changes in the sound level. Crisp controls the amount of treble content and there you can increase the clarity of the vocals, but you can also add a certain airiness to vocal tracks that can otherwise feel a bit wooly.
The next knob, Heat, also uses the developers’ own Neural System. This time it’s adding so-called vintage warmth, or as we used to say, distortion, in different forms and amounts. Heat can provide both a certain warmth, but also distortion that mimics the one we get from tube-powered machines such as mic preamps, or the tape saturation we got from our beloved tape machines. This function also has an on/off function if you prefer the sound as it is.
You can also adjust both input and output signals with sliders on the left and right edges of the app window.
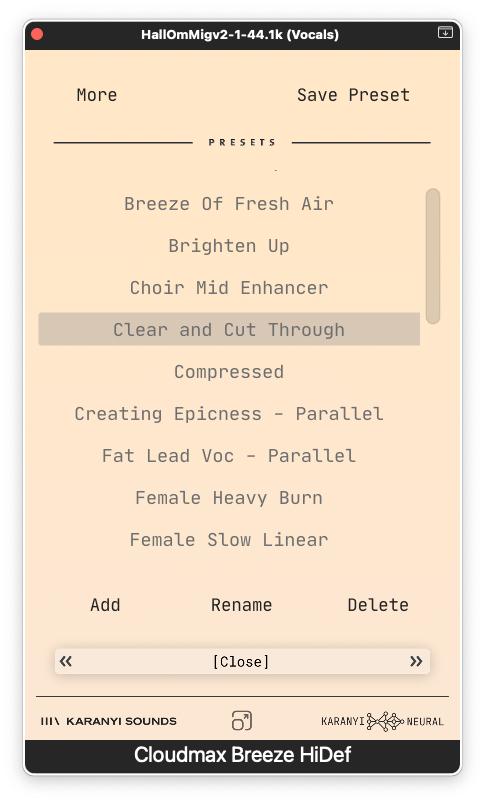
There are also a bunch of presets that you can use as a starting point, and you can also scale the interface up to 150 percent if you think the app is too small för a high-resolution screen.
Of course, Cloudmax Breeze also offers a number of ready-made presets that you can use as a starting point.
The various effects
The four effects units included in the Cloudmax Breeze may not be that remarkable in themselves. It is more the combination of them and the ability to quickly dial in a really professional vocal sound that is the Cloudmax Breeze’s biggest advantage. With the reverb included, you can create the illusion of everything from small intimate rooms to really large halls, or even hangar buildings if that’s what you’re looking for.
Crisp works great if you need to sharpen a vocal track that feels a bit bland. And the ability to add some warmth with Heat partly takes care of the other end of the frequency spectrum.
Makeup is something of an all-encompassing compressor section that works really well on most vocals. Sure, you don’t have the option to fine-tune attack and release down to the smallest decibel level, but if that’s what you’re looking for, you should probably choose a different plug-in from the start. Cloudmax Breeze is for those who want to quickly be able to create a usable vocal sound, and it actually does this beyond expectations.
Who could benefit from Cloudmax Breeze, you might wonder?
The developers claim that it is perfect for all types of vocals, and they mention as examples the professional studio that quickly needs to find good vocal sounds for several different vocalists, or beat-makers and singer-songwriters where you also need to quickly and smoothly create a nice vocal sound for, for example, a demo recording.
I tested the plug-in on various clean vocal tracks where I had previously tried to get a nice vocal sound, and I must admit that it worked really well with the suggestions I got from Cloudmax Breezer’s Capture function – if anything, I perhaps felt that it was a little too generous with the reverb in some cases, but this was very easily fixed. Furthermore, I also tested some tracks where I hade unmixed the vocals using Logic Pro’s Stem Separation function from a previously downmixed stereo audio file. These tracks contained some artifacts and oddities from the start, but I found that Cloudmax Breeze did a really good job of smoothing them out. The end result was clearly better than I had expected, especailly considering the source material.
Conclusion
If we were to try to sum this up with a few well-chosen words, the first two would be fast and easy to work with. Then we actually have to add the fact that the end result sounds really good, especially if you think about the areas of use that the developer has indicated. I really love plugins that are primarily intended to make things easier for the user. In my case, the user was a songwriter who wanted to quickly get a nice and usable vocal sound without having to tinker with a lot of different plugin effects, and in exactly such a situation, Cloudmax Breeze works perfectly. Price-wise, it is also very good for my type of user. Right now, just under 50 dollars feels undeniably very affordable.
System Requirements
Windows 8 or higher is recommended
At least 4 GB of RAM, 8 GB is recommended
2 GHz CPU with at least 4 cores
A VST3/AU/AAX compatible 64 bit host (DAW)
200 MB free disk space
Available Formats
Mac OS: AU, VST3 (64-bit)
Windows: VST3, AAX (64-bit)
Runs in any major VST/AU/AAX compatible DAW except: Maschine which is NOT supported.
Tested stable versions: Ableton Live 11.3.4, Logic Pro 10.7.4, Reaper 6.8
There are good and interesting delay plugins. And then there are those that are slightly better… and then there’s the German developers HOFA’s Color Delay. This delay is almost in a class of its own. Four different types of delay effects have been incorporated into one and the same plugin. But the developers didn’t stop there. Color Delay has also been equipped with a lot of extra effects and other functions, which make it a very useful plugin. We take a closer look…
Even before we started listening to it, we knew there was something special about this delay. The four different delay effects, Tape, Bucket Brigade, Digital and Destruction, can be used in any order and in any combination you want. In addition, you have access to effects such as Diffusion, Phasing, Chorus, Ducking and Auto-pan. But let’s start from the beginning.
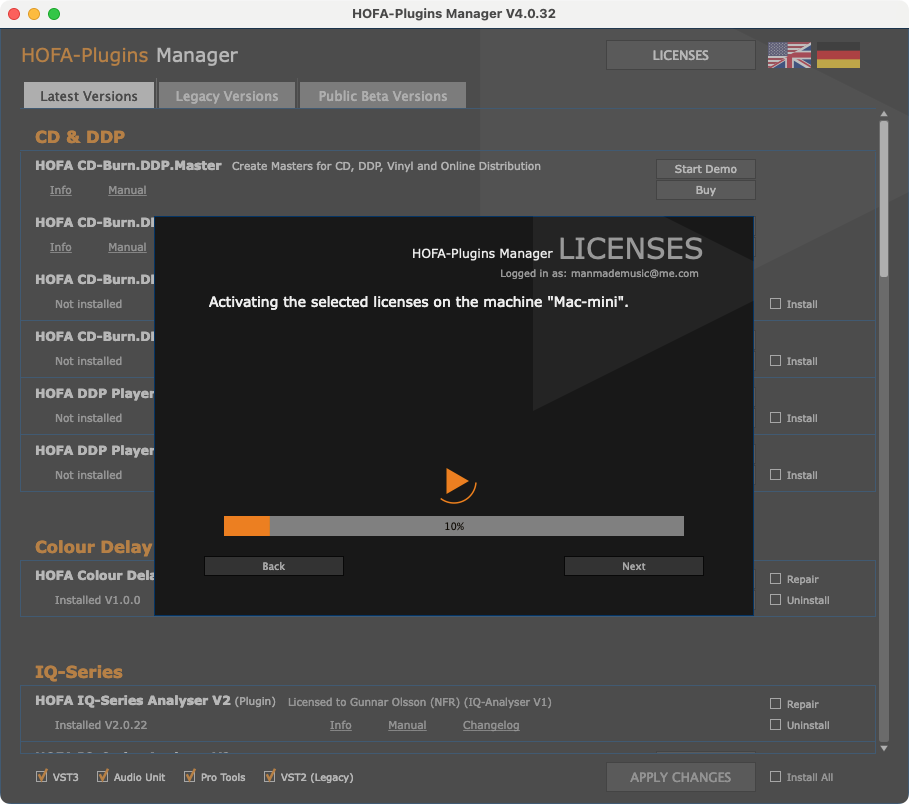
Installation using the HOFA Plugins Manager
From the developers’ website we download the HOFA Plugins Manager. With the help of this app, we can download, install, and then also authorize or license the software. You don’t need a special dongle for this, but if you need to be able to move the two licenses offered between different machines that may not have access to the web, you can place the licenses on a USB stick or similar. This way you can use your two licenses on two different computers and run them at the same time. This can be a desktop computer and a laptop, or a Mac and a PC, for those who feel like it.
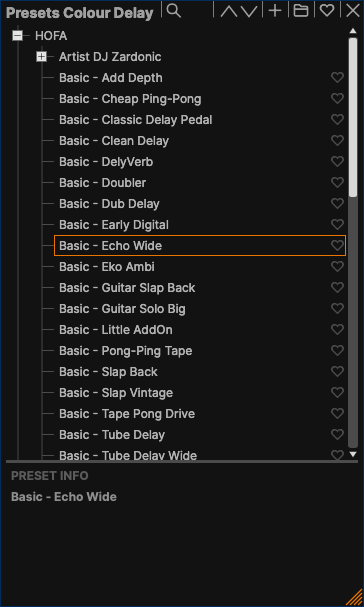
Of course, there is support for all known plugin formats and DAW programs, and you can also test HOFA Colour Delay by downloading a trial version that lasts for 14 days. Should these 14 days not be enough, surely HOFA will also be generous with extending them if you contact their support.
HOFA Colour Delay
There are those who have pointed out that the name may not be very original – for example, there is already a BBD-based delay from u-he called Colour Copy – but still … it has to be called something. And if the name doesn’t get that many extra plus points, I still have to award quite a few points for just about everything else related to the HOFA Color Delay. But let’s take a look at what this plugin can do with an audio signal that needs that little bit extra.
As we mentioned earlier, HOFA Colour Delay offers no less than four different types of delay effects, and you can run all four at the same time. The different delay types are Tape, Bucket Brigade, Digital and Destruction, and of course you choose how many of these different variants you want to use and in what order. Just drag and drop them in the order you prefer. The delay effects are all of such high quality that each one can absolutely stand on its own, but when you combine a couple of them (or more) you can create some really amazing sound effects. And when it comes to effects, you can also add some to the delay, if you think it’s needed. Here too, the range is really generous. Or how about diffusion, phaser, chorus, auto pan and ducker?
“When developing the Colour Delay, two things were vital for us: we wanted any imaginable sound to be realizable with just a few clicks. And combining the different colours should be really fun!”
Fabian Freitag & Jochen Sachse from HOFA-Plugins
Four types of Delay
Tape: This is a delay effect that emulates the old, trusted tape echo from the childhood of rock music. Here you can create just the right amount of tape compression for a truly successful nostalgia trip. Warmth, saturation and all the other artifacts that make tape so beloved today are here in abundance.
Bucket Brigade: This also has a really old pedigree, and there are plenty of lo-fi artifacts here. Bucket Brigade Delay is based on an old analog delay technology where an audio signal was sent into an IC circuit with a chain of capacitors. When the first capacitor is filled, the signal is sent on to the next one, and then to the next; one step for each clock cycle. This way you get a certain delay of the signal. At the same time, both the input and output signals are low-pass filtered in a BBD unit, and this, together with some other artifacts from the system, gives it a typical lo-fi sound, especially compared to modern digital delay units. Bucket Brigade Device refers to the old-fashioned chain of buckets filled with water that firefighters often had to use to fight fires in the past.
Digital: Even digital delay devices have their faults and shortcomings to a certain degree, depending on their design. Here there are effects such as aliasing and quantization distortion, which are due to low sampling frequencies and bit depths. This effect aims to emulate the early digital delay units which had an abundance of just such flaws.
Destruction: Here we are talking about real digital shortcomings, saturated sound and tube distortion – at its best/worst. As the name suggests, there are possibilities here for many forms of sonic destruction. Analog warmth in the form of tube distortion, sound that clips – you name it! Room for experimentation.
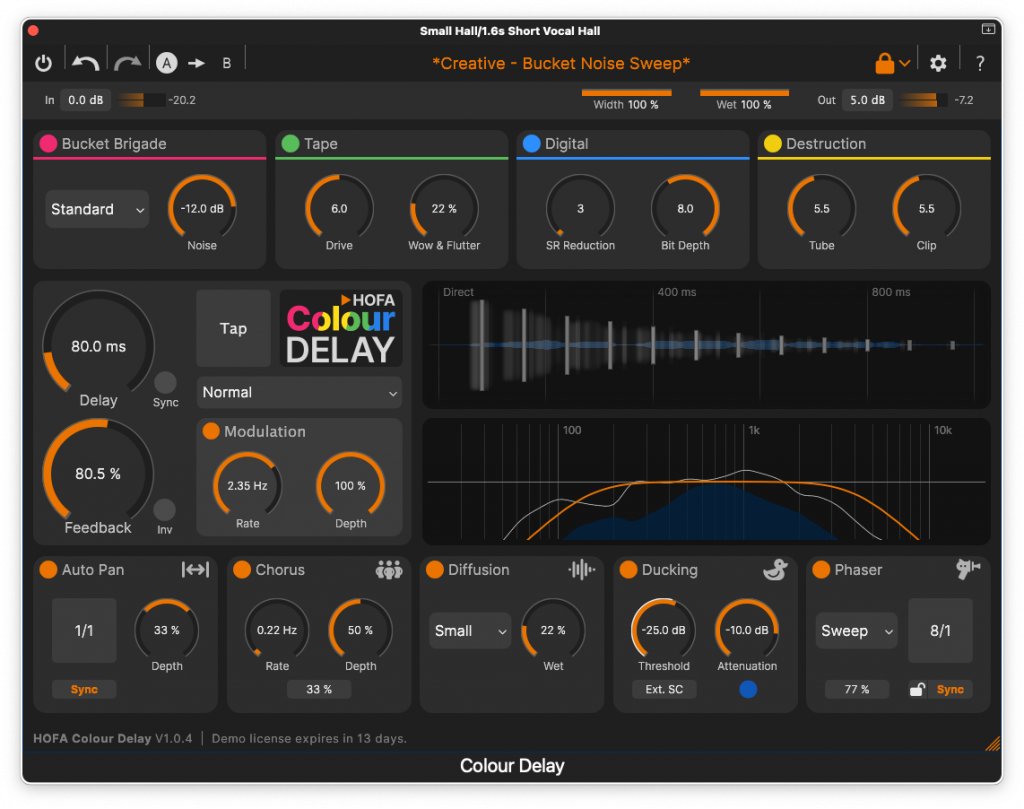
Here we use all four different delays to create a really strange sound.
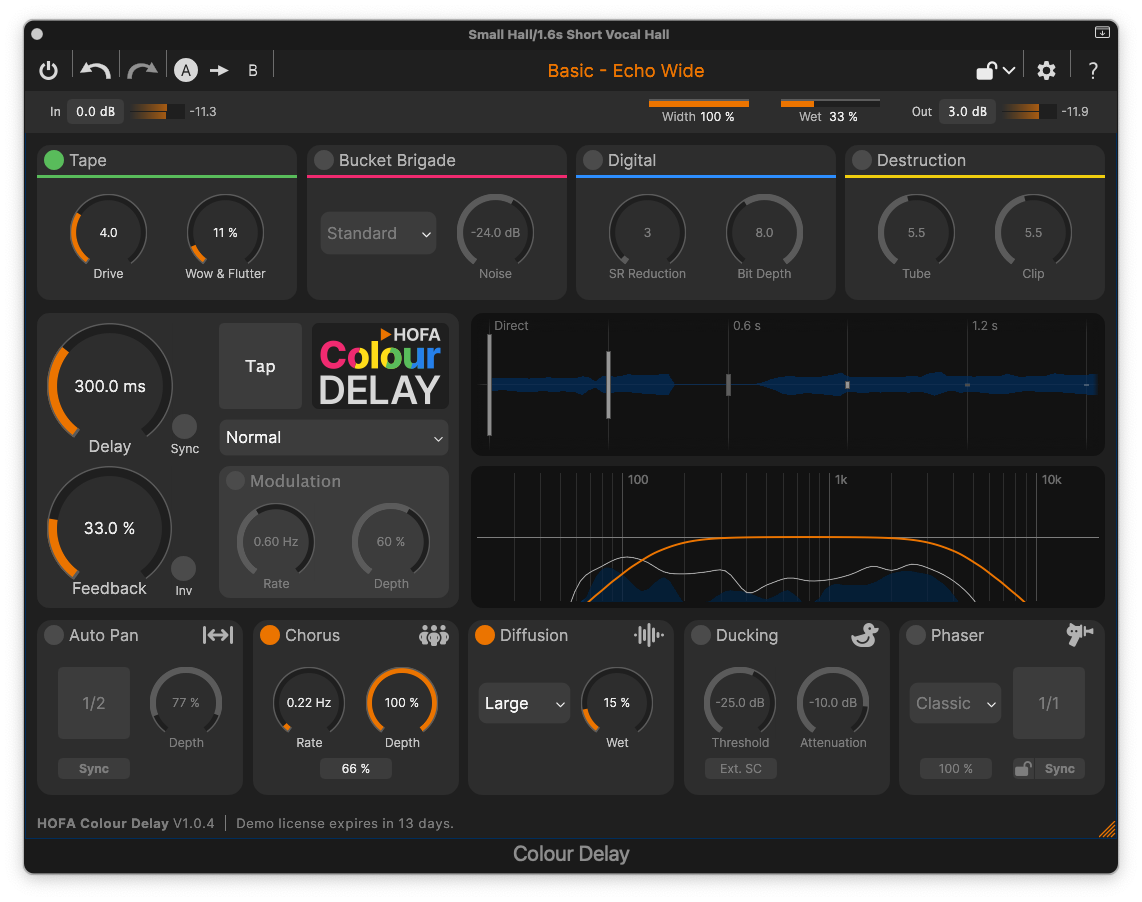
The Graphical User Interface – the GUI
You can actually access all the settings in one and the same window, and most things feel very intuitive and easy to understand. Centrally located in this window, the delays are displayed graphically as bars, along with waveforms of the sound passing through. Modulation results in “fuzzy” bars. Below this image is a diagram that shows frequency content along with a very useful EQ section. Everything is very interactive.
You will find the delays in the upper part of the window. Each delay has its own controls. Tape has knobs for Drive and Wow & Flutter. Bucket Brigade has different types of BBD effects (Standard, Vintage, and so on), as well as a knob for Noise. Digital has knobs for sample rate reduction (lovely word!) and bit depth, and finally, with Destruction, you can control the amount of Tube (distortion) and Clip.
Below this, you can control the amount of Delay, Feedback and Modulation, and also sync the effect to your DAW’s own tempo. There’s also a Tap function, where you physically tap the tempo you want on the delay. You can also choose from a variety of ping-pong effects here, where the echo bounces back and forth between the left and the right channels.
Of course, there are lots of interesting presets in HOFA Colour Delay.
Five post-delay-effects
In addition, you have access to five different specially designed effects to add after the delay.
Diffusion: Here you can create a dense sound structure with small reverb-like modulations – perfect for creating atmospheric soundscapes.
Phaser:This is a classic delay effect that can create a modulated movement and a more dynamic sound. Perfect for more rhythmic sounds.
Chorus: Another classic effect which creates a bigger stereo image using small pitch modulations. Works great on chords as well as solo parts.
Auto Pan: This creates a moving stereo image that floats between the left and the right channel – especially illusory when listening through headphones.
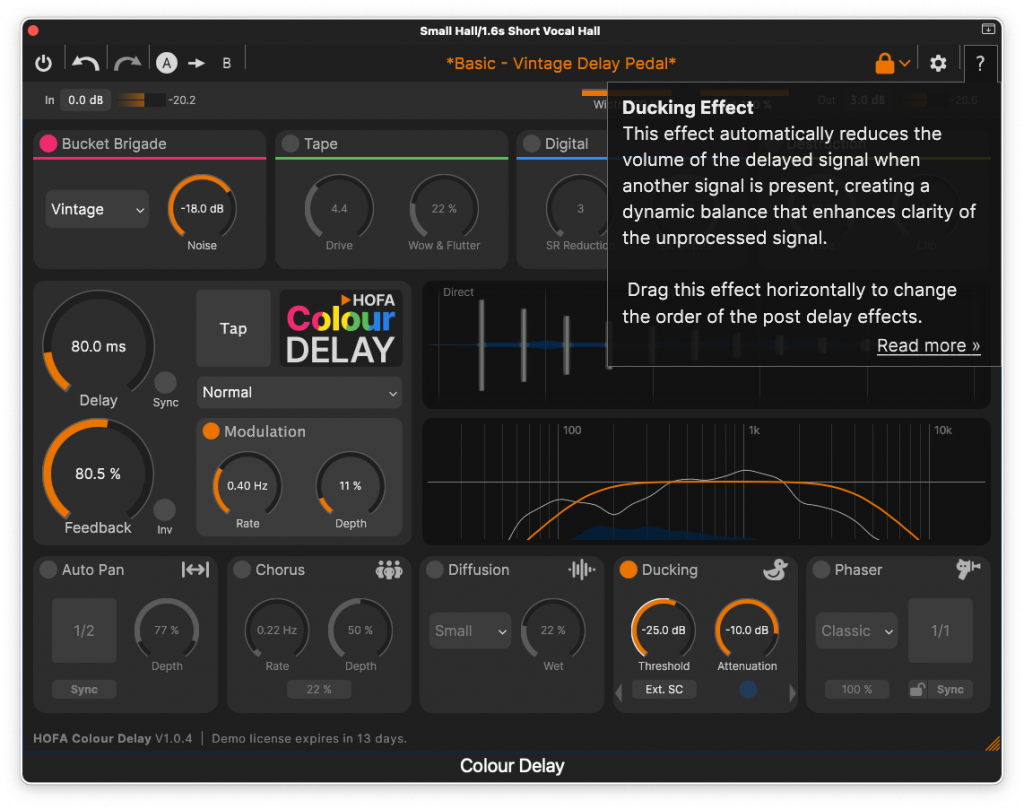
Ducker: We also have a ducker function that allows us to avoid drowning the original signal in echoes and delays. The ducker brings out the delay effects in pauses between different vocal or instrument phrases, and suppresses the effect when it risks clashing with what might be more important.
Even with these post-effects we have controls to fine-tune the different parameters, and in some cases – that is the diffusion and the phaser – you can also choose between different types of effects within the same genre. And here too, you can use the drag-and-drop method to decide in which order the various effects should be placed. The algorithms for these effects are claimed to be developed to work optimally with delay effects, and there is nothing to suggest otherwise. It all sounds absolutely amazing!
As an extra aid, you can get an explanatory text for the effect you have chosen.
Conclusion
It’s always fun to test effects plugins that shows that someone has clearly thought outside the narrow framework that developers – especially in previous years – have felt compelled to adhere to. A delay plugin can be so much more than just a delay. HOFA Colour Delay shows this with all the desired clarity. Here we are offered a lot of possibilities to manipulate the sound effects in exactly the direction we want – and then a little further into the unknown.
Four different delay types that we can combine in exactly the order we want, combined with a range of great-sounding and hand-picked special effects… This means a completely veritable smorgasbord of exciting and imaginative delay effects.
The fact that they the developers have focused a little extra on warm, vintage-like sound effects is of course not something we feel sorry about. On the contrary, we get just as warm inside as the many wonderful sounds we can create with HOFA Colour Delay.
We definitely don’t miss the squeaky clean, but oh so sterile and emotionless digital effects that we have been fed for many years. This is exactly how we want it to sound! A big thank you to all the developers at HOFA!
LINK
Here is a brief overview of how HOFA Colour Delay works:
SYSTEM REQUIREMENTS
Windows: Windows 7 or later
Mac: OS X 10.13 up to macOS 14 (Sonoma), Intel (64 Bit) or Apple Silicon
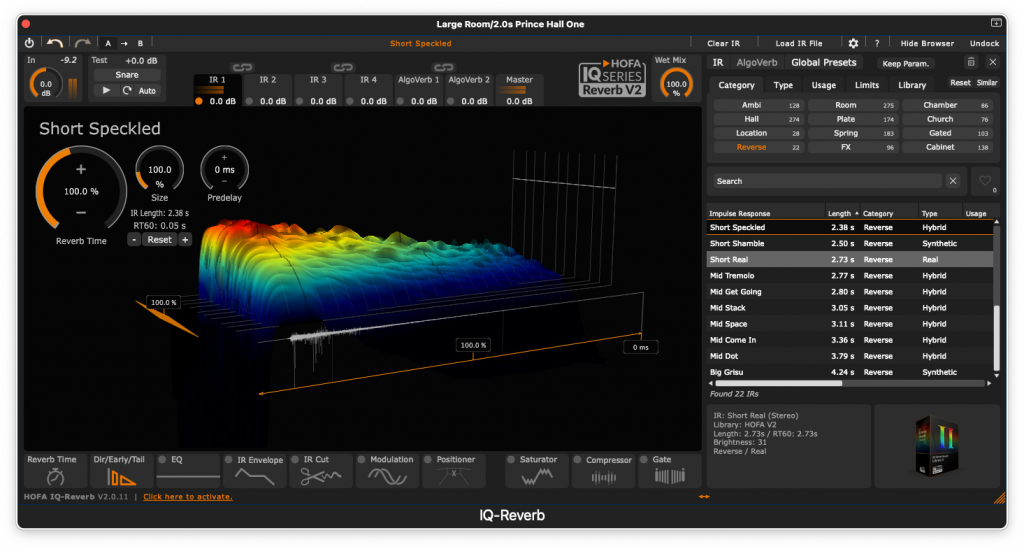
At the end of the era that was the heyday of the Swedish Musikermagasinet, more precisely issues 6 and 7 from 2023, we did a fairly extensive review of all the reverb plugins that we liked the most. It turned out to be a big pile, I think we landed on a total of 35 different plugins, but we missed one of the very best and it’s time to remedy that now. That’s why today we’re looking at the HOFA Plugins IQ-Series Reverb V2.
The German company HOFA has many legs to stand on. They run extensive online education, they have a mixing and mastering studio, but above all… They also develop damn good audio plugins. Not so long ago they released an absolutely wonderful delay plugin, HOFA Colour Delay (there will be a review shortly on this website), and they have an equally wonderful reverb plugin that has now reached version 2: HOFA Plugins IQ-Series Reverb V2.
HOFA Plugins IQ-Series Reverb V2
Released back in 2014, the first version of the extensive IQ-Series convolution-based Reverb plugin featured a solid collection of rich-sounding impulse responses from far and wide. But IQ-Series Reverb had so much more to offer. Not only had they stuffed an algorithm-based reverb sound engine into the package as well, but it also offered a lot of other features that made the reverb one of the most flexible on the market.
When IQ-Series Reverb V2 was released, a number of further improvements were made to an already excellent reverb plugin. You still have all the possibilities to affect the impulse responses in all sorts of useful ways; you can time-stretch or compress them, they can be gated, you can split them and edit the early reflections and the reverb tail in different ways. And of course, you still have “the Positioner” which allows you to place the sound source wherever you want in the stereo image.
The Positioner lets you place your sound-source wherever you want in the stereo image..
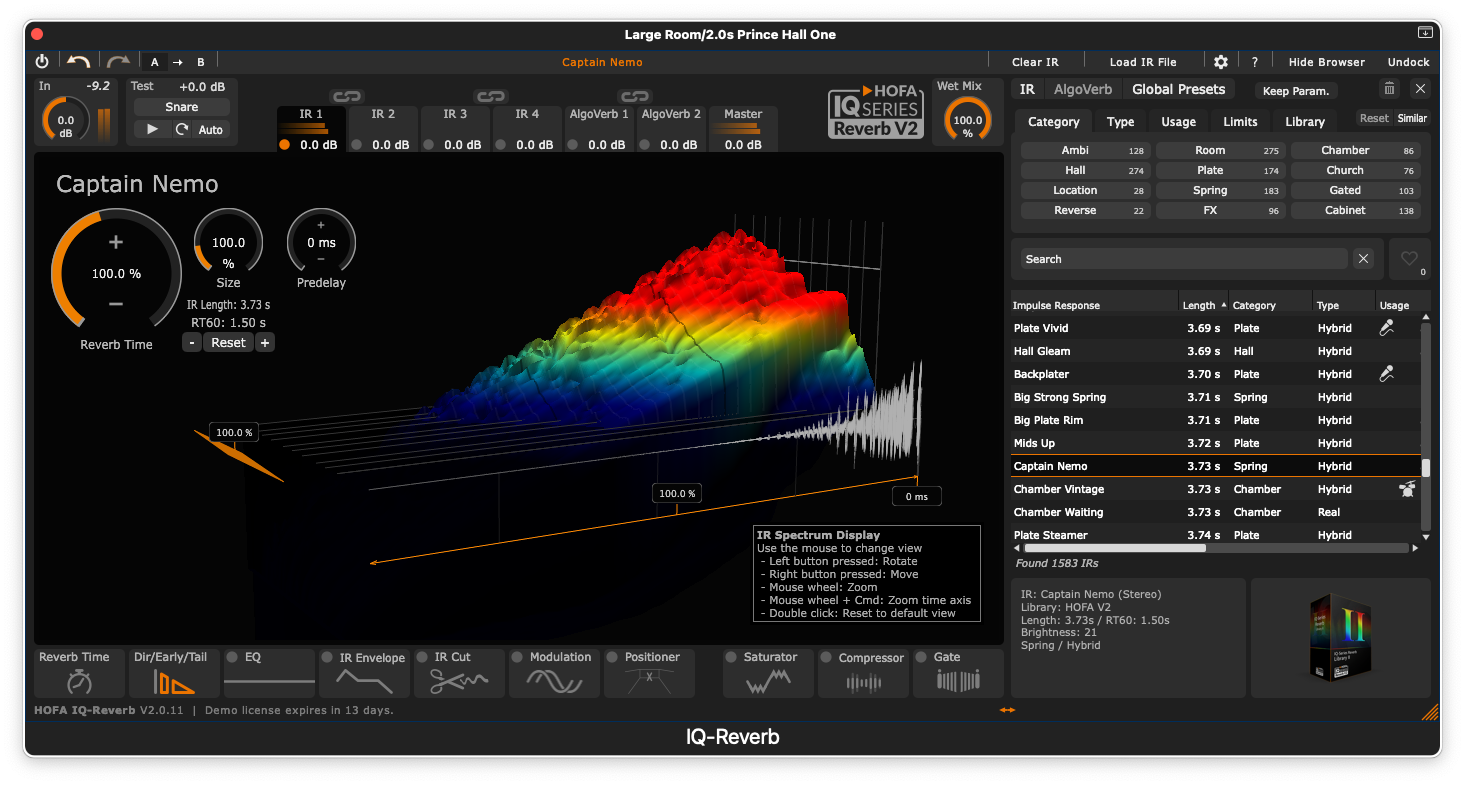
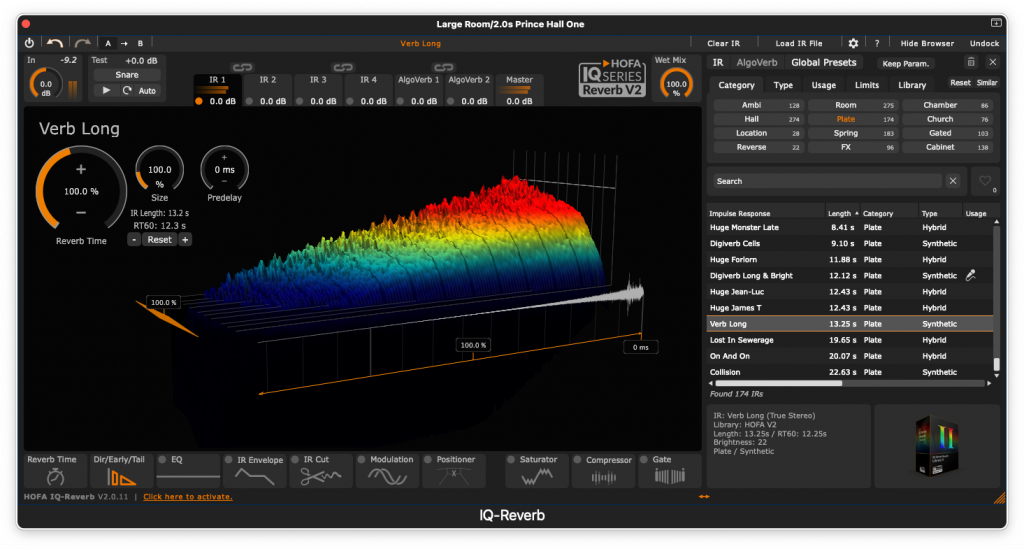
The browser part, where you can search among the almost 3,000 impulse responses (the standard version comes with almost 1,500 IRs), has received a major update, and above all, you can now unhook it from the other part of the GUI, and then enlarge both parts completely independently of each other. The searchability is absolutely excellent. You can search by area of application, type of reverb (plate, hall, etc), dark or light sound character, and so on, and when it comes to what the developers call Global Presets, they can now contain several different reverb variants – previously there was only one.
Outstanding versatility
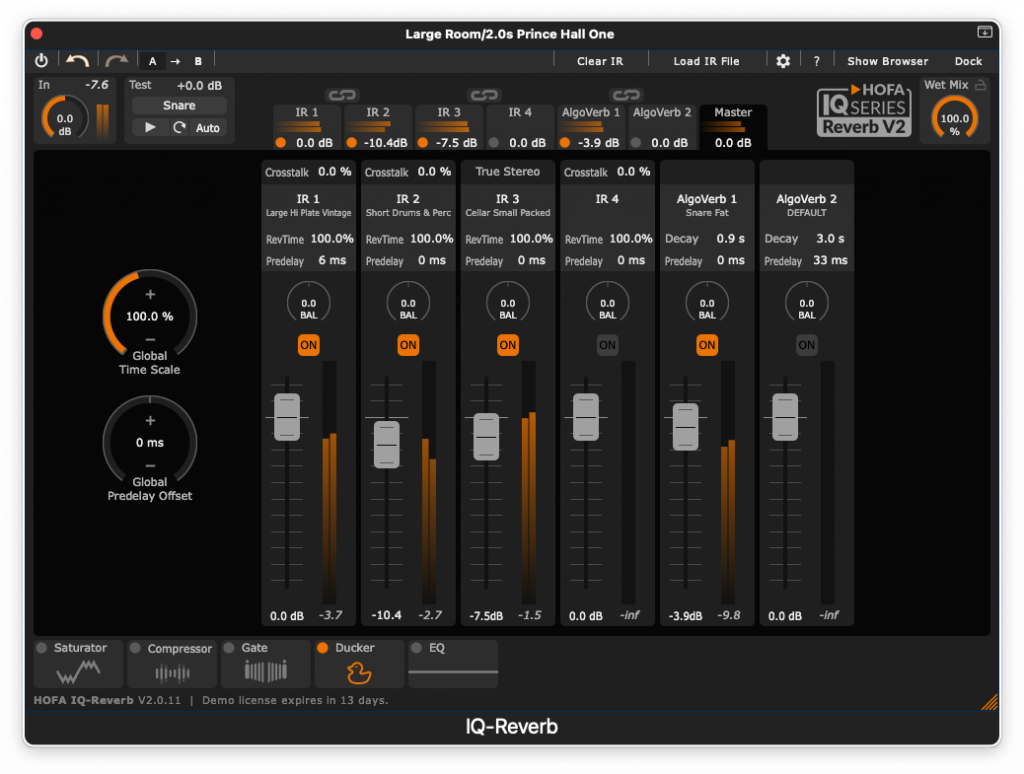
A reverb preset from the IQ-Series Reverb V2 can actually contain up to four different convolution-based reverb effects plus two algorithmic reverbs at the same time! Talk about creating interesting acoustic environments. To balance its different reverb types in the same preset, you also have access to a mixer section with separate faders for all included reverb effects plus a master fader for the entire mix. There you can also place each included reverb part wherever you want in a 5.1 surround perspective. Oh, what joy!
In the mixer you can decide how much of each reverb-part you want to use, and also mix for 5.1 Surround.
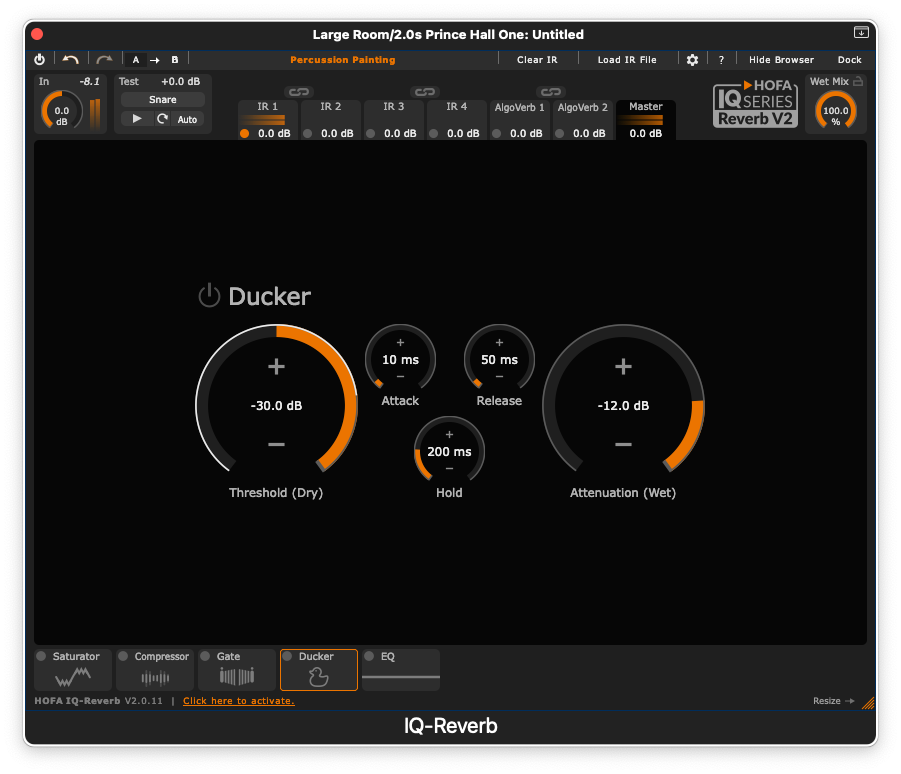
When it comes to the separate reverb sections, there are also plenty of settings. What about Reverb Time, Dir/Early Tail, EQ, IR Envelope, IR Cut, Modulation, Positioner, Saturator, Compressor and Gate – on the input side alone. On the output side, in addition to Saturator, Gate and EQ – there is also an excellent Ducking function. Almost overwhelming!
A nice Ducker might always come in handy!
But it never becomes difficult to understand how to handle the different parts or effects, because the graphical interface contains so many easy-to-understand parts, and the entire operation feels almost self-explanatory.
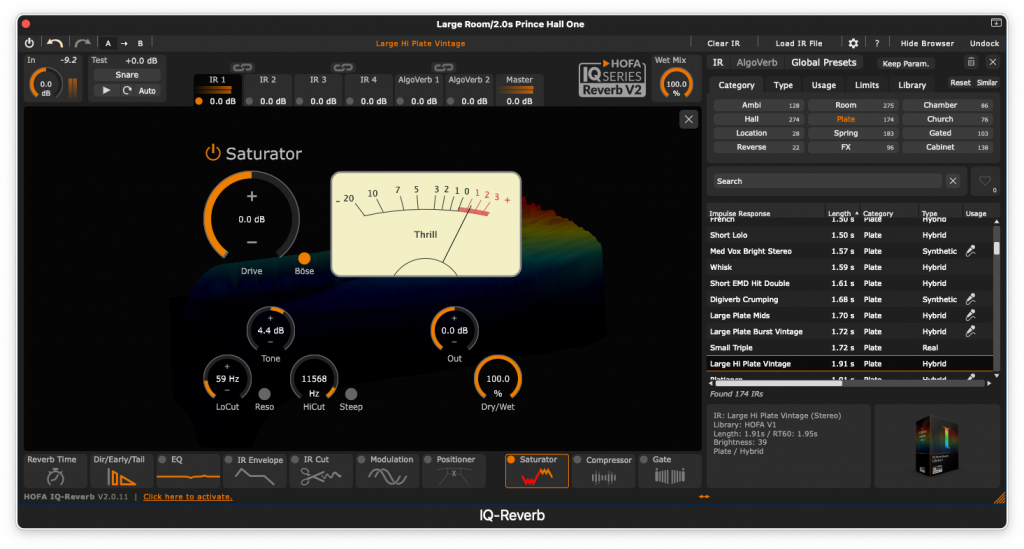
In the main window, you can twist and turn a waterfall diagram that symbolizes your chosen impulse response, and when you select an effect or adjustment function, it automatically appears in the large window. Very educational!
A Saturator (some might call it distortion) is another good option for affecting the reverb sound..
Installation with HOFA Plugins Manager
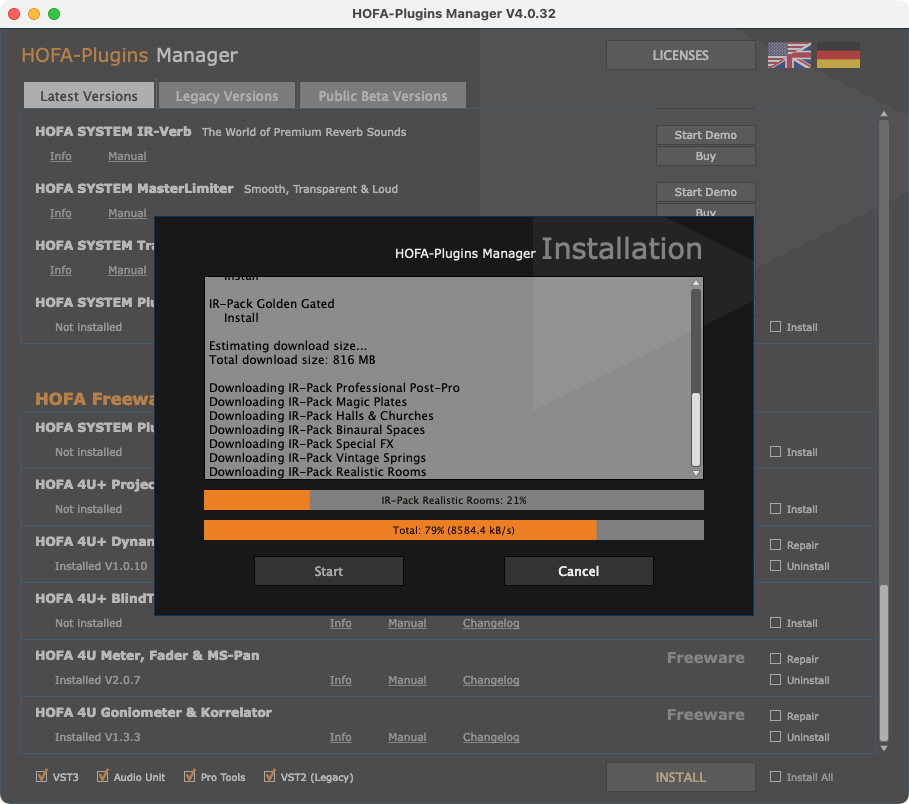
The installation is done using HOFA Plugins Manager, which can be downloaded from the developers’ website. This software also handles the authorization of all HOFA plugins. So you don’t need a separate dongle or similar. However, you can put your license on a USB stick if you prefer this, or if your computer does not have constant access to the internet. You get two licenses so you can have access to your effects on, for example, a desktop and a laptop at the same time, and of course you have support for all known plugin formats and DAW programs. In addition to the around 1500 impulse responses included in the basic set, you can buy new IRs in different packages. In total, HOFA offers 2,886 different impulse responses for the reverb-hungry. You can also test IQ-Series Reverb V2 by downloading a trial version that lasts for 14 days. Should these 14 days not be enough, HOFa I’ve heard rumours that HOFA might be generous in extending them, if you just contact their support.
The HOFA Plugin Manager lets you install all the parts of the reverb as well as licensing it..
Lasting impression
As for the sonic impression of the HOFA Plugins IQ-Series Reverb V2, this is of course very interesting, but at the same time you have to keep in mind that all such things are often a matter of personal preference. After all, there is a lot that can be accommodated within the concept of taste. For my own personal part, however, I have to state that I would like to place this reverb plug-in among the ones I appreciate the most in all categories. The basic sounds are absolutely excellent, but then you can also adjust them to the exact sound you want. If you then combine a few different reverb instances of different nature in one and the same effect, you can really create the most interesting sounds.
The range of impulse response is absolutely outstanding, and the algorithm-based effects sound really good too. And together… Wow!
HOFA IQ-series reverb V2 offers full 5.1 Surround support, lots of extra effects as aids, ready-made reverbs such as Room, Ambience, Chamber, Hall, Church, Plate, Space, Spring, FX, Reverse, Hybrid and Cabinet – I was more than a little extra delighted with the smallest rooms; it really felt like you were in the room.
What would a pro-reverb be without a reverse effect?. This one sounds excellent!
One could argue that the price of the Basic Version of the IQ-Series Reverb with its 1,500 different impulse responses is on the higher side at 262.50 euros, but if you consider what you get for that kind of money, it actually feels really affordable. If it then turns out that the HOFA IQ-Series Reverb v.2 is the reverb you use the most (or maybe exclusively), then maybe we can even talk about a bargain price. But download the trial version and test it for yourself! I don’t think you’ll be disappointed. I definitely wasn’t.
Link
Here are some of the highlights from the HOFA IQ-Series Reverb V2:
System Requirements
Windows: Windows 7 or later Mac: OS X 10.13 up to macOS 14 (Sonoma), Intel (64 Bit) or Apple Silicon
DEVELOPER HOFA Plugins INFO www.hofa-plugins.de PRICE IQ-Series Reverb V2 Basic version: 262:50 euro; extra IR-packs 49:50 euro/each; IQ-Series Reverb V2 med 8 IR-packs: Just nu: 335:09 euro
EQ and filter units often have a tendency to divide people into groups. In the case of the PSP Datamix A567 from Polish software developers PSP Audioware, this is especially true. The developers have even gone so far as to warn users in advance: “You’ll either love this plug-in or you’ll really hate it.” No wonder I was really curious.
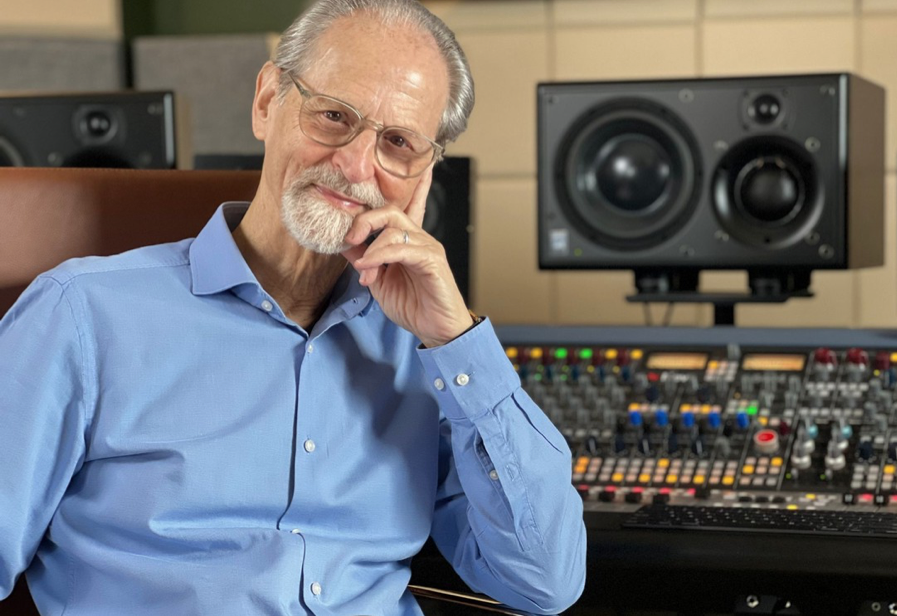
Eddie Kramer…
Eddie Kramer, or Edwin H. Kramer as he is actually called, is currently based in Canada, but he originally hails from South Africa. He has made a name for himself as a recording engineer and producer, and as such he has worked with artists such as Jimi Hendrix, the Beatles, David Bowie, the Rolling Stones, Led Zeppelin, Eric Clapton, the Kinks, Kiss, John Mellencamp as well as Carlos Santana. He has also contributed his expertise to the recording of soundtracks for films such as Blue Wild Angel: Live at the Isle of Wight, Jimi Plays Monterey, Live at the Fillmore East, Mad Dogs and Englishmen, Rainbow Bridge, The Song Remains the Same and Woodstock: Music from the Original Soundtrack, plus many more.
Eddie Kramer moved to London at the age of 19 after his parents moved there from Cape Town a few months earlier, largely because they could not stand the Apartheid regime in South Africa. In his homeland, Eddie had studied piano from the age of four and he had also taken both violin and cello lessons. In London, he quickly became involved in the music scene and already in 1962 he got his first job at a recording studio. Soon he had worked as a technician on recordings with both the Kinks, the Searchers and Sammy David Jr. He also had the honor of recording two tracks with the Beatles: ”All You Need Is Love” and ”Baby You’re a Rich Man”. Both of these tracks were recorded at Olympic Studios in Barnes, London, and there he later found the opportunity to record both the Rolling Stones, Small Faces, Traffic and Jimi Hendrix.
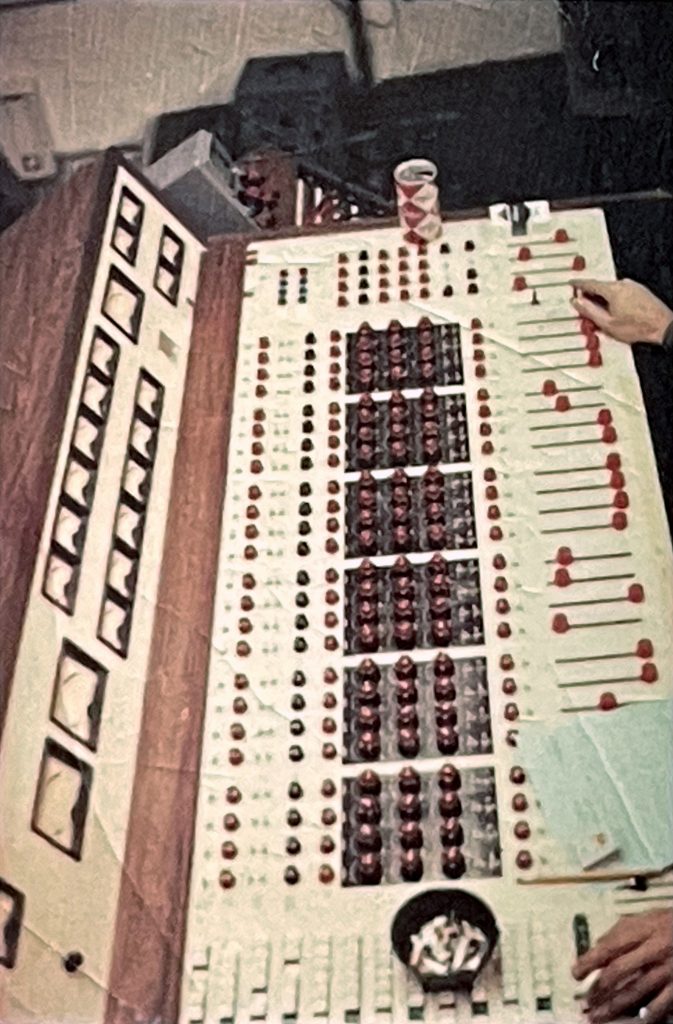
Electric Lady Studios
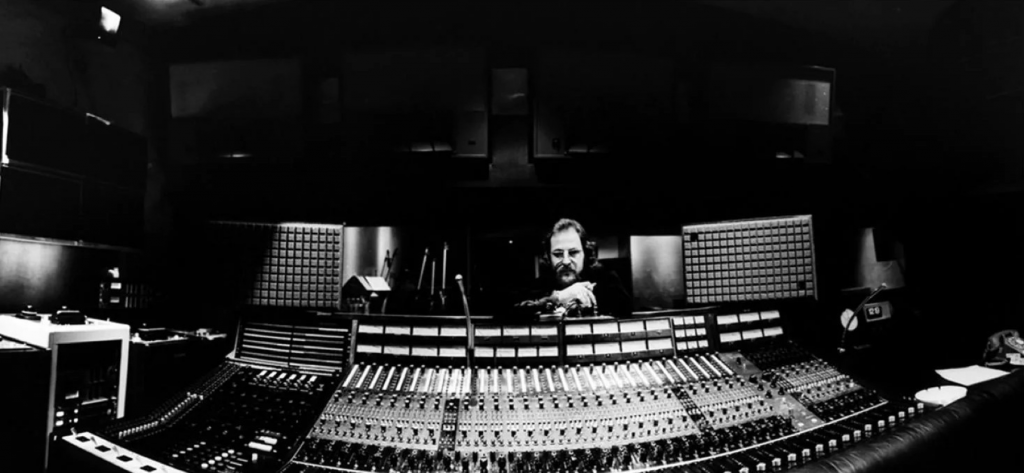
With Hendrix, Kramer recorded no less than four albums, the last one at The Record Plant in New York, where he moved in 1968. He was also very involved in the construction of Hendrix’s studio Electric Lady Studios. A construction that cost, at the time a somewhat unimaginable 1 million dollars, and where we also found one of the very few mixing desks from Datamix. Initially, two Datamix desks had been ordered, but only one of them was completed – and barely – before the company behind the mixing desks went bankrupt. With the help of technicians at Electric Lady, the first desk was saved and eventually the second Datamix desk was also built, but this took several months.
Sadly enough, Hendrix passed away only a couple of weeks before the studio could be inaugurated, but during the last four weeks of his life, he and Kramer were able to record some new songs, overdub existing material and mix the album The Cry Of Love, which was then released posthumously after Hendrix’s death.
Eddie Kramer behind the Datamix console at the newly completed Electric Lady Studio A. Photo: John Vetri.
Eddie Kramer has been active as a technician and producer well into the 21st century, and he is also a renowned photographer with exhibitions where he has shown pictures of both Hendrix and a number of other top-class artists. And of course, he is one of those who really loves the PSP Datamix A567. He even contributes with some of his own presets.
He says this about his experiences:
”In today’s market, it’s great having the Datamix mic pre and equalizer available to use on contemporary Pop/Rock, R&B, Hip Hop, Metal – where every producer/engineer is looking for something different. This is the weapon of choice!”
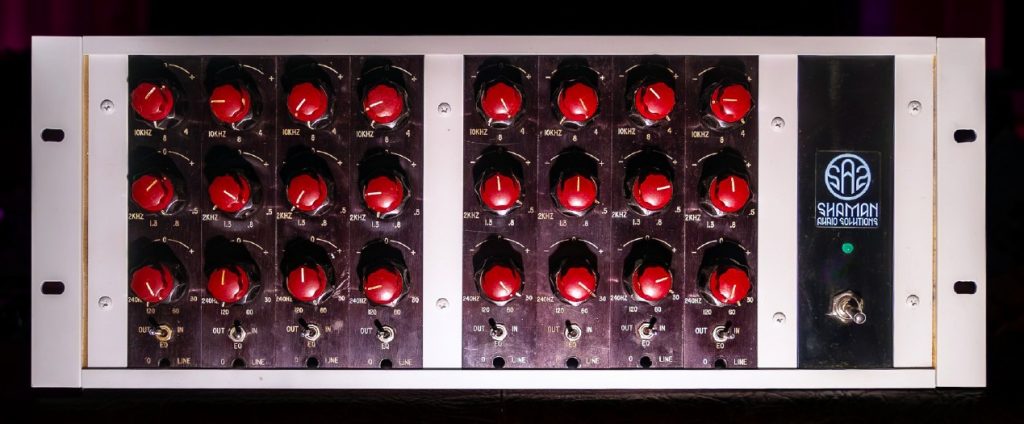
PSP Datamix A567
But back to today’s topic…
The PSP Datamix A567 is a software-modeled version of the preamp and EQ unit from the first generation Datamix mixing console. PSP Audioware has used no less than eight different filter modules from the original console that was sitting in the Record Plant studio. This is thanks to a certain Adam Piskorz, who was willing to lend them the modules. I’ve read about other single filter units from these consoles being out and about, but to be able to lay their hands on eight units of these classics must have been a gift from above.
The 8 Units from the Datamix console kindly lent to PSP Audioware by Adam Piskorz. Photo: Adam Piskorz.
Well, one of PSP’s founders, Antoni Ożyński, is known to have admitted that he didn’t know much about Datamix consoles. It was only when Adam Piskorz told him about the amazing preamp and filter units and how they had helped shape the sound of many of the classic records from the late 60’s that the PSP people really got going.
I have to admit that I also knew very little about Datamix when I started looking into this plug-in. If you search Google for the name, you actually get hits advertising wet feeding systems for pigs, so it’s perhaps not surprising that some of us have lived in blissful ignorance about these interesting electronic modules.
One of the two consoles from Electric Lady is now said to be at the Museum of Pop Culture (MoPOP) in Seattle, and some of the other surviving mixing consoles have been taken apart and “looted” at high prices, mainly for the very special filter parts. No complete example of the Datamix consoles have survived today, so if you want to access the special Datamix sound, there is now really only the PSP Datamix A567 as a way out for those who have not managed to get hold of a module from one of the original consoles.
The eight units that PSP used come from the console at Record Plant studios, and a great deal of care has been put into making the software so that it really does the classic hardware full justice.
Hard work lies behind…
PSP Audioware has previously collaborated with Avedis Audio Electronics, the company behind Datamix. That time it was a different EQ plug: PSP E27 Avedis. This time the developers at PSP Audioware have really worked hard to emulate how the mic pre and filter section of the Datamix units affects an audio signal down to the smallest component. One of the special features of the filters in the original consoles was that the three filter-bands behaved differently depending on which frequencies you chose to affect, whether you wanted to cut or boost a certain frequency, and so on.
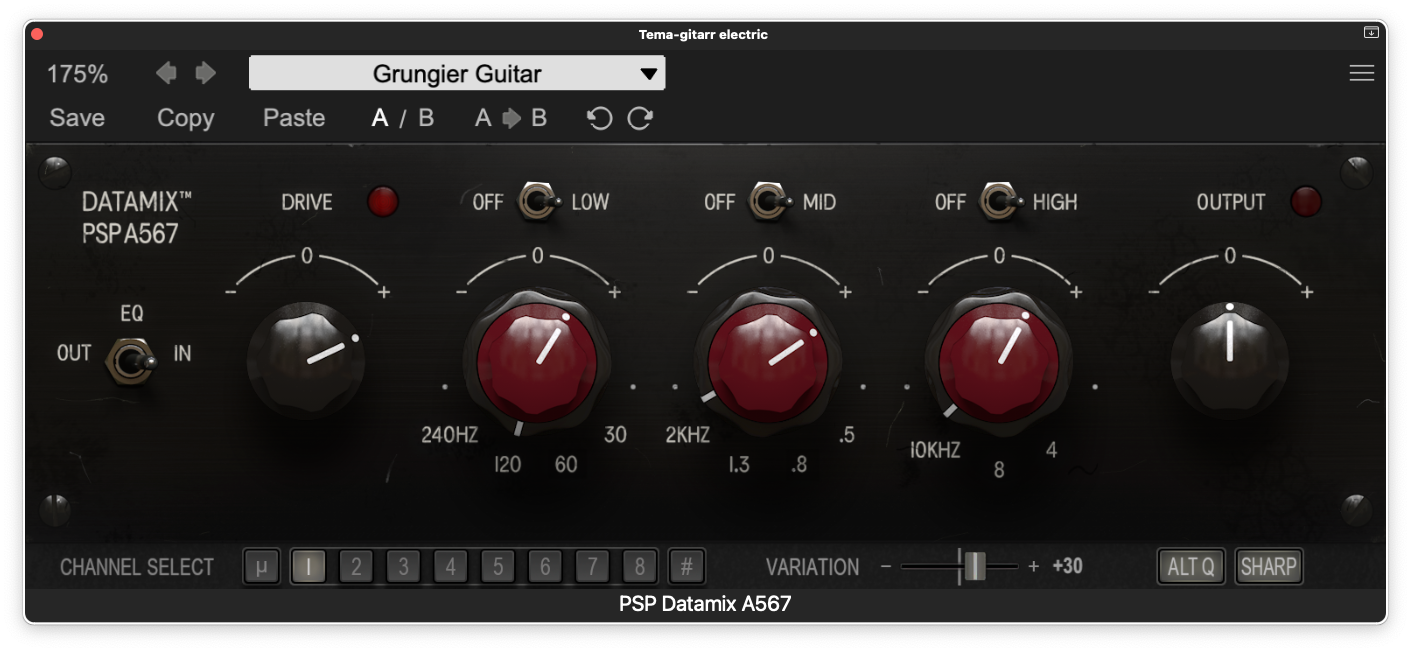
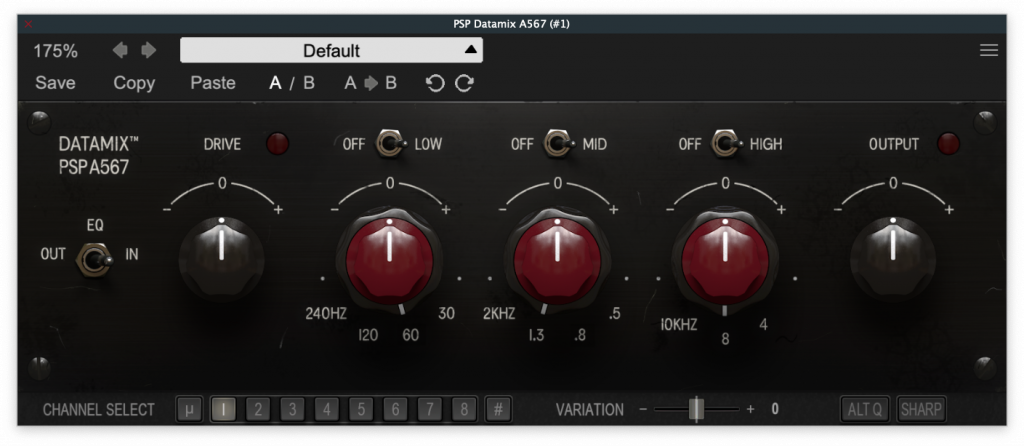
At first glance, the filters do look fairly simple. Three bands – Low, Mid and High – with a switch for each band, a large knob where you choose how much you want to affect the frequency band, and outside this another knob – with stepped positions where you choose which frequency you want to affect. Below the knobs you can read the frequencies that were in the originals – 240, 120, 60, and 30 Hz for the bass register; 0.5, 0.8, 1.3 and 2 kHz for the mid-range register and finally 4, 8 or 10 kHz for the High register. Here, however, PSP has chosen to add a few more frequencies between those given from the original modules. When you select these intermediate positions, the frequencies are still shown with blue numbers, so that you know where you are.
Below these knobs you find a row of buttons. Eight of them represent the eight different filter modules that PSP analyzed. They all sound slightly different, just like in real life. A button with a µ indicates an average value from all the modules, whereas with the button marked with # you get an ideal value instead, which gives exactly the values that all the numbers indicate.
The Variation fader allows you to adjust differences between the left and right channels of the filters. Alt Q gives you the ability to boost or cut given frequencies without affecting the Q value of the filters. In the originals – and with the usual settings in this plug-in – the bandwidth/Q value of the filters becomes narrower at more extreme filter adjustments. The last button, Sharp, can give different emphasized resonances, especially in the upper frequency range.
Tracking and Mixing Console Equalizer
The original consoles were equipped with transformers, and this has also been simulated in the software. A Drive control on the input can give a good portion of analog “preamp saturation” in the sound, and at full throttle (+30 dB) we do get a lot of really fat distortion, for those situations where you need it. With the Output knob you can simulate how a transformer might affect the sound, but you can of course also compensate for any level differences that may arise in the signal chain.
Using the Drive knob, you can achieve some really fat and naughty distortion.
And then there was the matter of how the filters affect the audio signal… All three filters have a so-called “peaking bell” curve when “boosted”. When cutting frequencies, the Low filter has a peaking curve down to 85 Hz; below this frequency it becomes a shelving filter instead. The Mid filter on the other hand gives a notch curve when cutting, and the High filter acts as shelving at all frequencies. Together with all the other inherent functions of the datamix 567, this means that you have really incredible possibilities to affect the sound, and – above all – give it a really nice analog feel.
This sounds very interesting
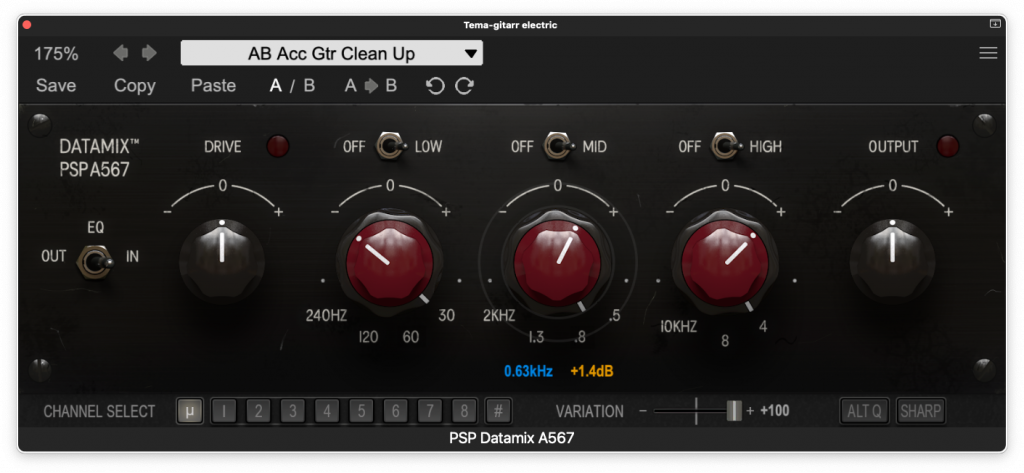
The PSP Datamix A567 is designed so that the filter section almost never sounds completely neutral. That was not the intention of the Datamix consoles’ EQ section either.
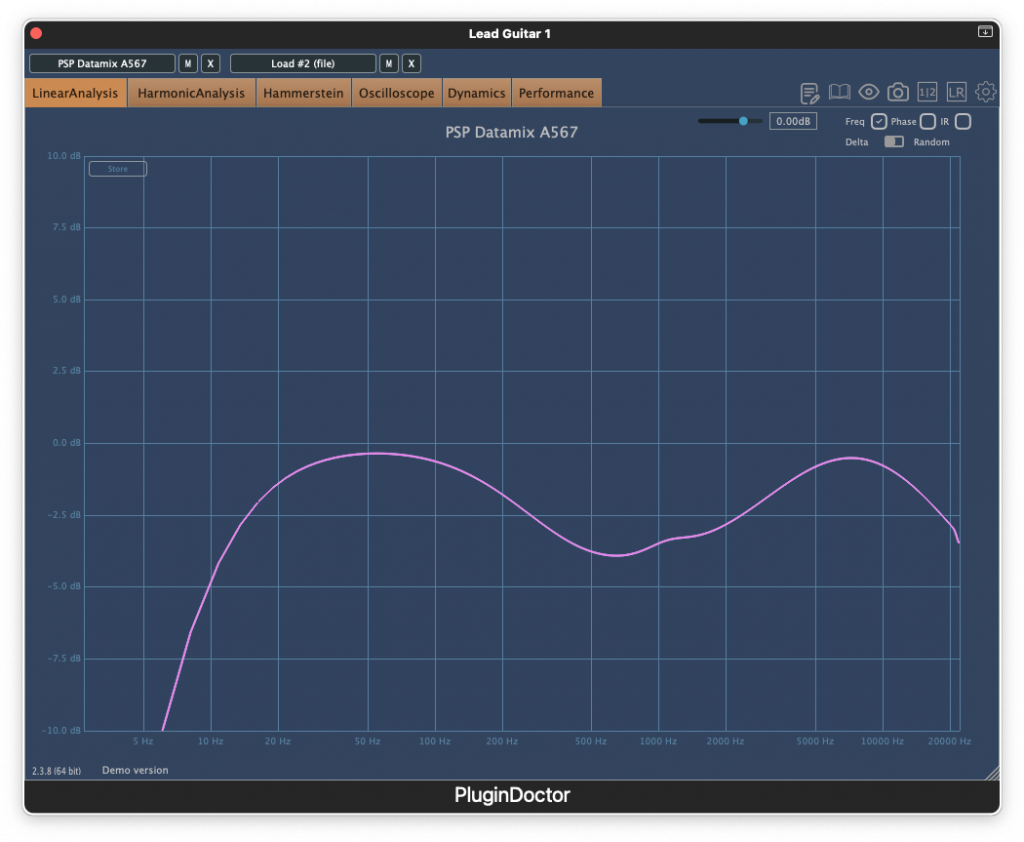
Here we cut 3 dB at 1.3k while boosting a couple of dB further up in the higher register, and it certainly sounds very interesting…
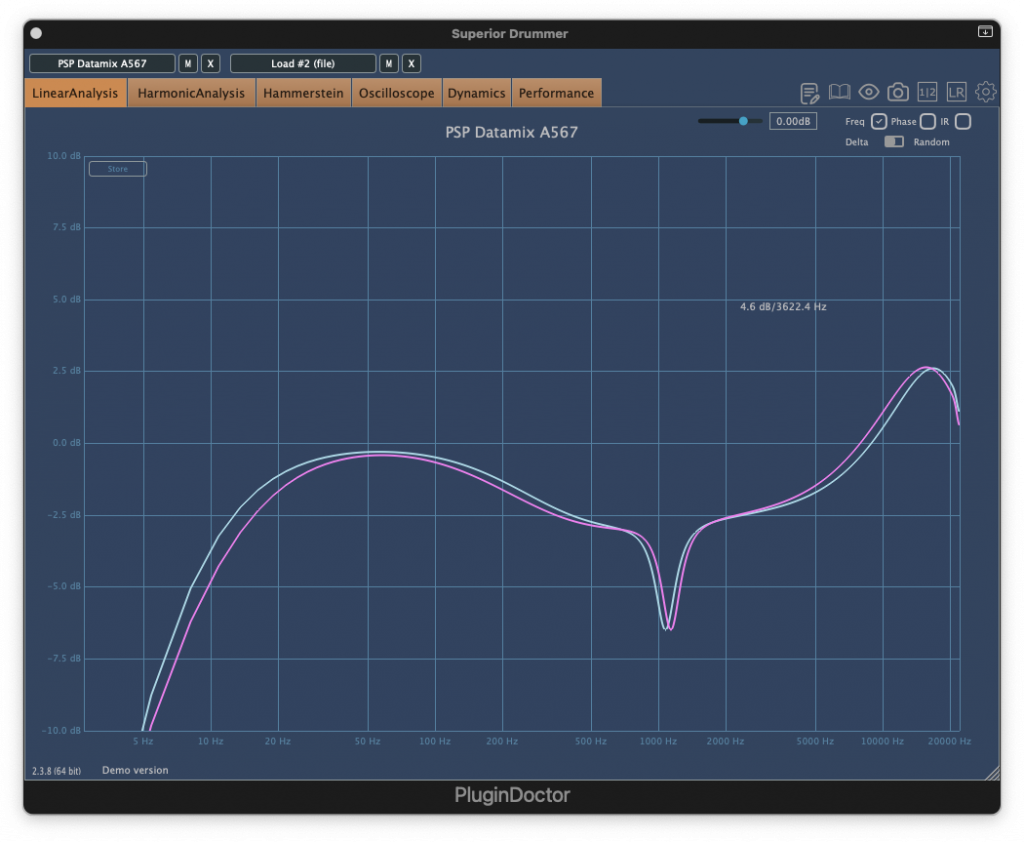
If you look at a frequency curve, you see that even if you don’t use any of the three band filters, the sound is affected solely by the plug being connected to the signal chain – this is also said to be a characteristic from the original consoles.
Here all the knobs are at 0dB… And yet the sound is really wonderfully analog and warm.
The developers themselves say that you either love this sound or you hate it. Personally, I find it extremely difficult to understand how anyone could hate software that sounds so wonderfully and imprudently fat, warm and analog!
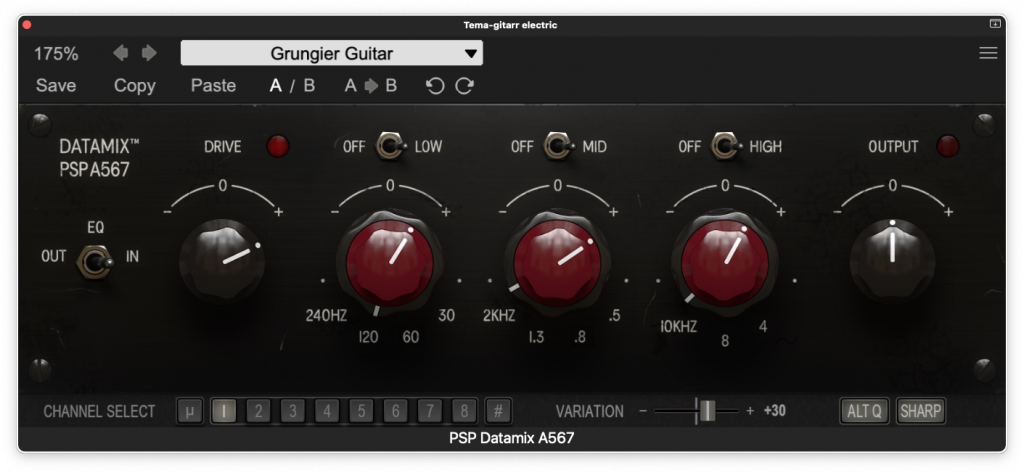
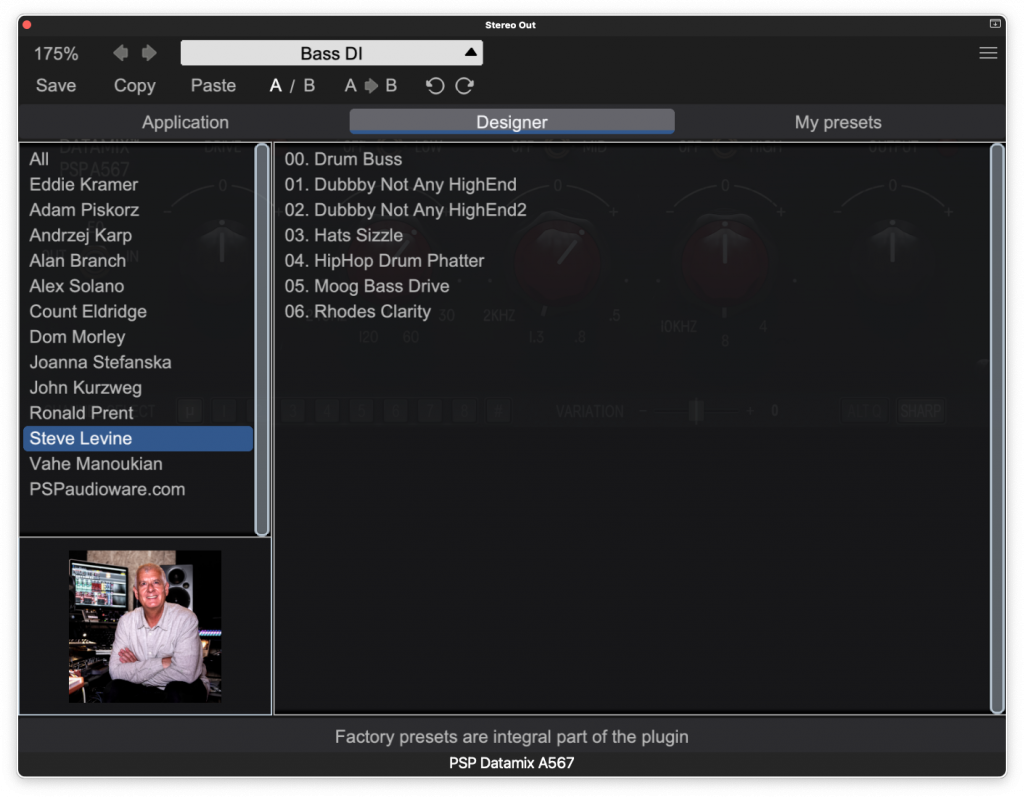
To top it all off, PSP Datamix A567 offers over a hundred presets created by a variety of heavyweights in the audio industry, including some really useful settings from Eddie Kramer himself. As we have previously pointed out, he has expressed his strong approval of this plug-in.
Here we see the names of the other top names who have contributed their own presets.
Summary
The PSP Datamix A567 is somewhat of an odd bird in the audio world. Where there are now a lot of EQ plugins that can be used for recording, mastering, and God-knows-what, PSP Audioware instead niches itself much more strictly with the Datamix plugin. It is supposed to exactly mimic the sound of the preamp stages and the filter section of another odd bird, this time from the late 60´s, the Datamix console. This is a mixing console that was designed by Bill Stoddard and only a few copies were produced before the company behind the console was forced to go bankrupt. Thankfully, Adam Piskorz managed to get hold of eight (!) of these strips and he kindly enough offered to lend them to Antoni Ożyński and the other technicians at PSP Audioware.
The developers have done a fantastic job of emulating these devices down to the smallest component, and they have also added some features that were not available on the Datamix console itself.
The PSP Datamix A567 does not claim to sound neutral – quite the opposite! As soon as you connect the plugin, you hear how the sound takes on a different, and in my opinion much more pleasant, character. Then you start twiddling all the available knobs and buttons, and this time it is more or less a heaven for all lovers of analog warmth, or whatever you want to call it.
As the developers themselves say: “You either love or hate this plugin.” At least I know which side I am on. I absolutely looove the PSP Datamix A567! Try this plugin! You have 30 days to decide, and there is definitely no need for a week of regret.
Here is a short video showing what you can achieve with the PSP Datamix A567:
System Requirements
An iLok accountis required for both the trial and the full version; 3 licenses can be freely distributed between different computers or iLok dongles (2nd generation or newer)
PC
VST, VST3 and AAX
Windows 7 – Windows 11 (64-bit support only)
macOS Intel or macOS Silicon
AudioUnit, VST, VST3 and AAX
macOSX 10.14 Mojave – macOS 15 Sequoia (64-bit support only)
Did I ever tell you about the Black Beauty? No? Well, I’d better then…
I was 18 at the time, and I was studying to be an electronics engineer in Örebro, a small town in the middle of Sweden. Well, I was supposed to study anyway, but to be honest, for some strange reason, I was far more interested in music than in doing my homework, learning about Ohm’s Second Law, and things like that. I liked the blues, mainly the Chicago style, as played by people like Muddy Waters, John Lee Hooker and the King of the Blues himself, mister B.B. King.
The records by those statesmen of the blues, were hard to get hold of in Sweden. Most of the licks I heard, and tried to copy, came from the gifted fingers of white guys living in the U.K. There was this guy, in particular, who was portrayed in an article in Melody Maker, a popular music magazine from England, which I could buy from my local tobacconist’s. His name was Jimmy Page, and he worked as a guitarist doing sessions for almost every popular artist and band in England at the time. In the photo, which was accompanying this article, he was more or less caressing a lovely piece of instrument. It was a Gibson Les Paul Custom. And before you ask me… Yes, of course I’ve seen a Les Paul before, but this one was really different. It had three pickups and it was black. Well, in those days you seldom saw a colour picture in a magazine of this kind anyway, but you could still tell from the black-and-white picture, that this guitar was black. Black as the night.
I immediately fell in love with this beautiful creature, but in my heart of hearts I knew we were never to be.
I mean, I had a white old telecaster and she was really more than okay. The image of this beauty haunted me and when I found a second-hand copy of Jimmy Page’s guitar in the window of a local music shop, I was really thrilled. This instrument had a few dings and blemishes, but still it was more or less identical to Page’s guitar.
I wanted it so badly, but how on earth was I going to be able to finance this purchase? The asking price was 850 SEK (about $100). I had no extra job and it was really more than I could afford at the time…
I tried every trick in the book to find that cash, but no luck, and days and weeks passed by. Every once in a while I cruised past the music shop, just to catch a glimpse of the Black Beauty – she was still sitting in the shop window. Truthfully it was no coincidence that I happened to walk by this shop every day, more or less.
My last ditch of hope was if I could somehow persuade my dear old mother to help me out with at least a part of this handsome sum of money – remember, we’re talking mid 60’s now.
One night, after having cooked my mother a surprise dinner, she finally gave in, and she told me I could borrow the money.
Ecstatic, the next morning I ran the few hundred yards to the music shop in a matter of seconds flat, and I managed to reach for the handle just as the shop-keeper was unlocking the door. Panting and out of breath I managed to ask:
– The Black Beauty… is she still for sale?
The man starred at me blankly for a few seconds, until finally a look of realization cleared his brow:
– Ah, you mean the second-hand Les Paul Custom? Well, I’m terribly sorry, but I sold it yesterday, to a guitarist playing in this band from Hjortkvarn?
– Hjortkvarn, I said, as if this little village had anything at all to do with anything, at this very moment.
– Yes, Hjortkvarn, he replied.
– You must be joking, I said. It’s been sitting in your window for more than six weeks, and now you tell me it’s been sold???
– I’m sorry, he said, but that’s what we do for a living. We sell guitars.
I was devastated. I couldn’t believe my ears – nor my eyes, suddenly seeing the place where she has sat, now filled with another guitar.
– Hjortkvarn…
This was the last thing he heard me say. I left and I never went back to that shop. I also never saw the Black Beauty again. Through the years l occasionally heard rumours about people having seen a black Les Paul Custom with three pickups – once in Gothenburg, another time in Stockholm – but I never saw her with my own eyes again.
A couple of years later I managed to get hold of a quite nice cherry ES-345, a bit similar to the one B.B. King and Alvin Lee were playing at the time, but within a few months I knew this wasn’t true love, and never would be. Not like the love I had for the Black Beauty.
I tell myself though, that if I had managed to buy the Les Paul Custom that day in this shop, within a few years I probably would have traded it in, for a new and nicer model. Just like I had with the ES-345.
On the other hand, maybe she would have stayed with me even ‘til this day … more than 50 years later. Well, you never know, do you?
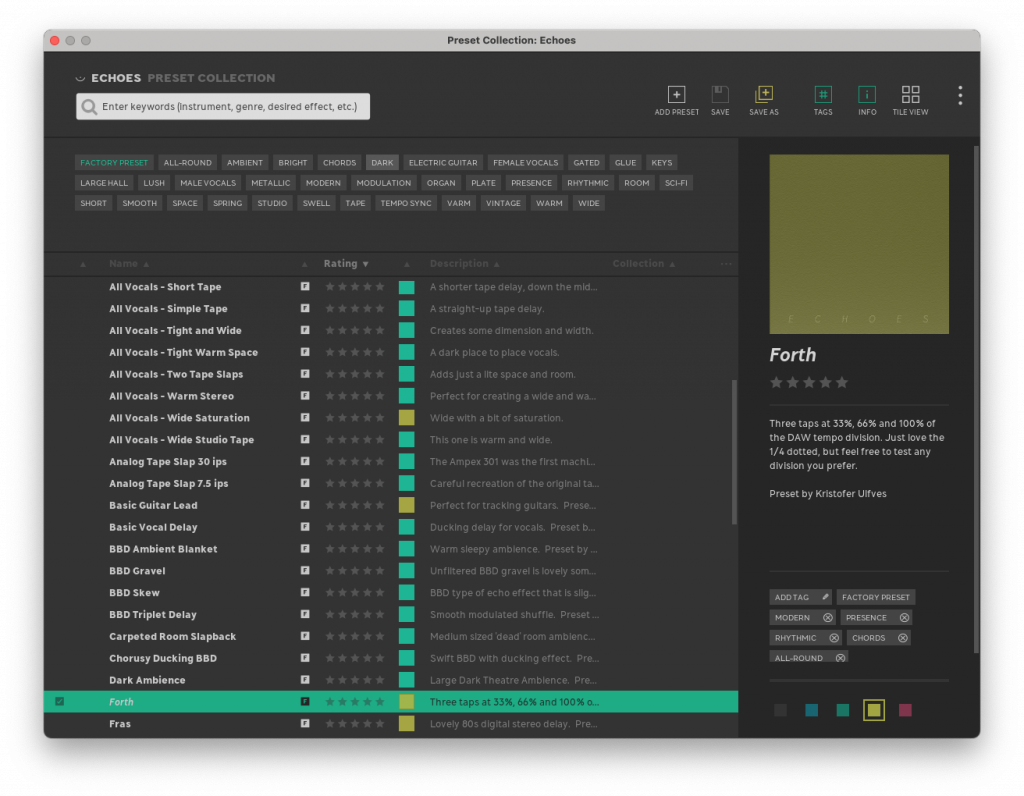
Softube already has an excellent tape-echo on its program, but the developers behind the Swedish software are capable of so much more. That’s why we weren’t particularly surprised when late in November they made a sneak release of yet another delay (Echoes), this time only to the subscribers of their newsletter. Of course we jumped at the offer, and ever since then the echoes have just been bouncing around our little music studio. Now it’s available to anyone interested.
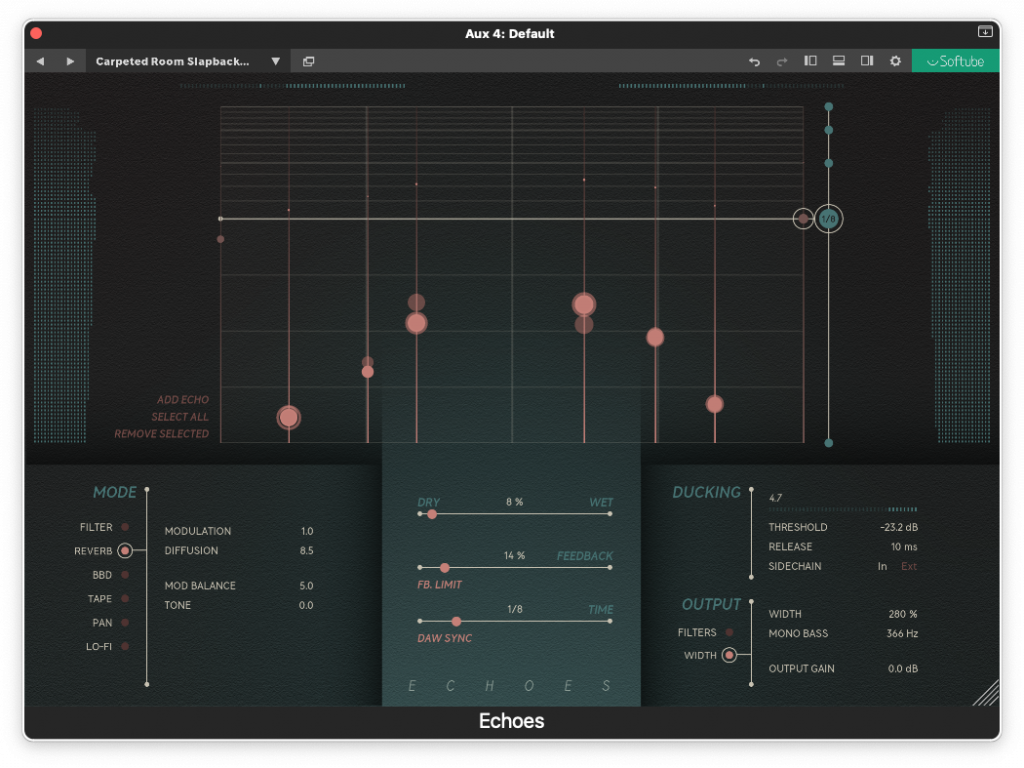
Echoes also offers an excellent algorithm-based reverb.
Softube Echoes
Now, of course, we have to step up and try to tell the world about this formidable software. Echoes offers no less than six different delay variants with quite different basic characteristics: Filter, Reverb, BBD, Tape, Pan and Lo-fi.
Filter is a normal delay with a slightly filtered feedback part. A perfect echo effect for vocal overdubs.
Reverb works great for synths and guitar overdubs, and this algorithmic reverb has been created using the different echo taps.
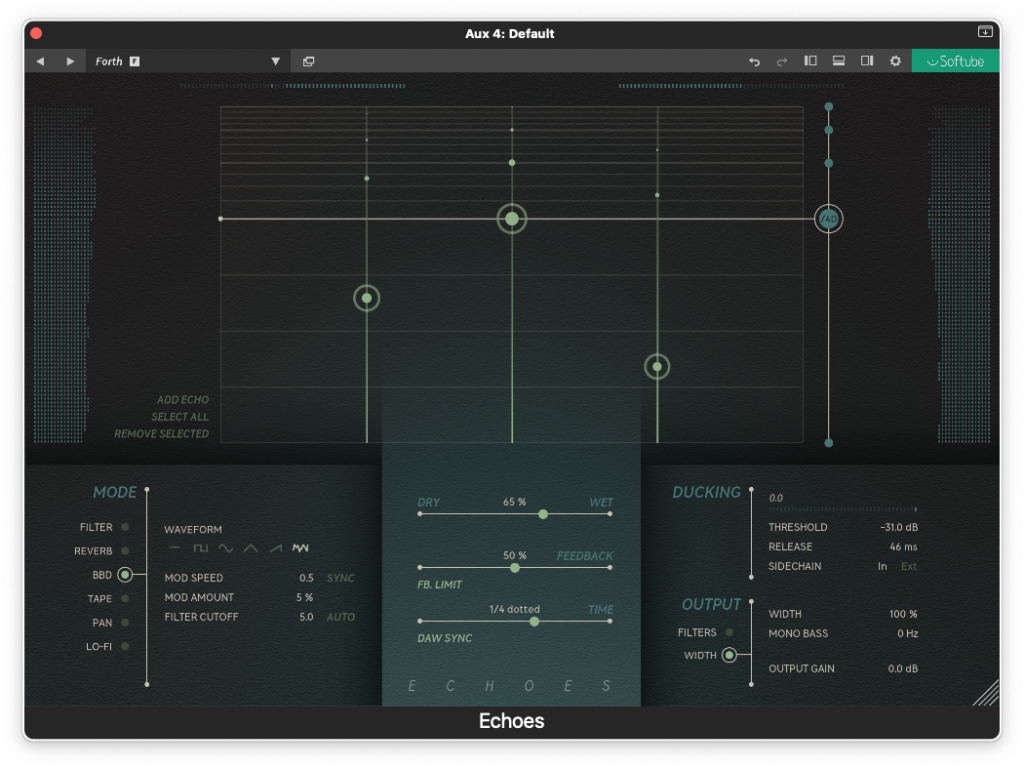
BBD, or Bucket Brigade Device, as it is pronounced, is an analog delay technology that appeared in various delay pedals for us guitarists back in the 70s. Here, that effect has been recreated in digital form, complete with various aliasing effects.
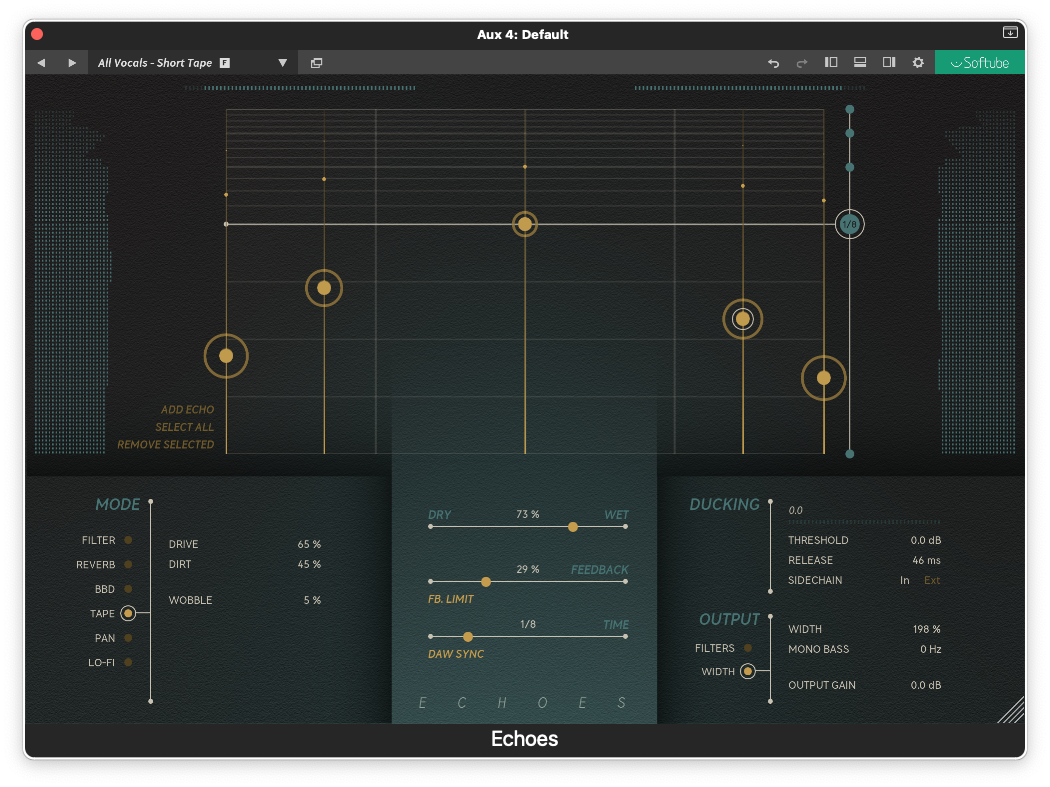
Tape is based on the echo devices we’ve heard on countless records – especially on vocals – and here we’ve been given the opportunity to adjust a number of previously unwanted side effects such as distortion (drive), dirt and wobble.
Pan widens the stereo image even on mono sources, and can also create a certain movement with static sound sources, such as keyboards with sustain (-pedals).
Last, but certainly not least, we have Lo-fi. It is excellent for recreating the effect of generally “crappy” echo effects from, for example, low-budget devices from the past. Here they use bit-crushing in combination with modeled synth 4-pole filtering.
Each delay variant has its own set of adjustable variables. Here we see the BBD delay.
A formidable user interface
Softube has managed to create a user interface that is unlike anything we’ve seen before, but despite this, you have no problem understanding how everything works. Good job there, gentlemen (and ladies) developers!
Here you will find controls for the mix between dry and affected signal, for the delay time – in milliseconds or bars (if you sync to your DAW) – and for feedback. And there we also have a feedback limiter that should protect us against rampant feedback.
There is also a ducking function that allows the delay effect to be kept in check, so that it does not drown out vocals or other solo elements, but only blooms in the silence between solo phrases. The only thing I miss is the ability to lock the wet/dry mix when browsing between different presets.
In the output section, you can widen the stereo image, focus low-frequency tones into a mono image, or filter your echo effect to your liking.
Each individual delay variant has also been endowed with a variety of different setting options for that particular type of delay effect. For example, for Lo-fi we have settings for sampling frequency, bit depth, envelope follower and filter cutoff. For the reverb effect, modulation, diffusion, modulation balance and tone are offered, and for the BBD delay we find settings for waveform, modulation speed and amount, plus filter cutoff. Not bad!
You can also click in the window wherever you want and decide that you want another echo right there. Then you can move it by dragging it to the exact position in the stereo image that you like. Yum!
Echoes also offers a set of Extended Features.
Extended Features…
Softube Echoes also supports what the developers call “Extended Features”. If you click on three different symbols at the top of the Echoes window, a good set of meters for the input signal and side-chain ditto will appear on the left. On the right we find the corresponding ones for the output side and a gain-matching function. Below we find meters for head-room, a high-pass filter and a phase inverter. Thank you very much!
These are functions that you can pull out when you need them, and otherwise just put them away to save space on the screen. Really clever indeed! This feature is now available in a variety of Softube plugins, and it certainly feels useful.
Here’s how to bring up “Extended Features”:
Open Extended Features by clicking on any of the three icons in the menu bar.
Sound images
But what good would all these features be if Echoes didn’t also sound really good? Well, it really does! Here you can play around with the most entertaining, astonishing, or just simply divinely beautiful delay effects imaginable! Before I opened the plug-in, I was a little worried about whether I would be able to appreciate the reverb in Echoes – it rarely sounds very good if you just put in reverb as an after-thought because you think you might need one. But all my doubts were put to shame. The reverb effect in Echoes is a really good and good-sounding algorithm reverb. Clearly useful in a variety of different sound situations.
And the rest of the delay effects sound just as good as you’ve gotten used to when it comes to plug-in effects from Softube. A top rating is gladly awarded there! Here you can actually find most of what you could possibly need in the way of delay. And the adjustment options are simply brilliant. It’s really as easy as looking for a preset that you think might work, and then tweaking it so it fits exactly where you want it.
Softube Echoes offers a variety of useful presets to start with for your music creation.
Summary
With Echoes, Softube has presented an extremely powerful and good-sounding delay effect. It offers six different delay variants: Filter, Reverb, BBD, Tape, Pan and Lo-FI and a number of extremely useful preset settings to start from. In addition, each individual delay effect has a good set of fine-tuning options. And on top of all this, you have both a ducking function, an output section where you can change the stereo image and, as the icing on the cake, the extra functions under Extended Features.
The sterling interface makes Echoes very easy to work with, it’s easy to set individual delayers/taps so that they sync with your music, and also place them exactly where you want them in the stereo image. You just get that genuinely happy feeling! Thank you Softube for an absolutely wonderful delay plugin!
Link: Watch a walkthrough.
System Requirements
Monterey 12, Ventura 13, Sonoma 14
Windows 10 (64-bit), Windows 11
Softube account
iLok account
Computer with AU, VST, VST3 and/or AAX compatible DAW software
Internet access (to download installations and manage licenses)
PRICE Normally: 1,570 SEK; currently 1,039 SEK
INFO www.softube.com/echoes
PLUS
Sounds absolutely great
Excellent interface
Six different delay variants
Lots of great presets/settings
Lots of great features
MINUS
I would have liked to be able to lock the wet/dry mix
In the iZotope Catalyst Series, the developers now present a third program, the delay app Cascadia. We check this up a little extra…
After the success of Aurora and Plasma, iZotope continues on the beaten path and presents Cascadia, an intelligent tape-delay app with what the developers call “adaptive unmasking”, a function that automatically ensures that you experience the sound as both clear and focused.
Cascadia is a very versatile delay. For us users, this is a most welcome addition to our other delay apps. We should perhaps also mention that several of the competitors have developed apps with a similar concept; Swedish Softube just launched their Echoes and from German Hofa Plugins we have now seen Color Delay. We hope to return to both of these, but today it is iZotope Cascadia that is placed on the test bench.
Ducking and Adaptive Unmasking
There is an inherent problem with most reverb and delay apps. The problem is that reverb tails and delays have a tendency to mush the sound, if it is placed on top of fairly dense tracks. You want the effect to come into its own between different vocal or instrumental phrases; not lie as a constant blanket over the entire track. In the past, sound engineers could solve this by sending the signal via a side-chain where they used a gate or a compressor to keep the effect under control when the sound was at its most intense. This is called “ducking”, and the result was that the reverb or delay was kept somewhat at bay during the important phrases and then allowed to bloom, when the vocal phrases temporarily fell silent.
Other delays and reverbs have had similar ducking features, but iZotope has refined the whole process and takes this a few steps further. Not only does it adjust the level of the effect, but it also dynamically filters the effect signal, giving you a very useful effect that is always there without taking attention away from the original signal.
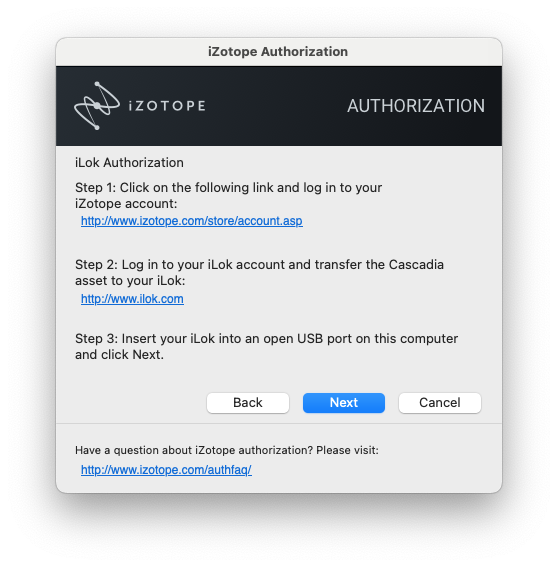
iZotope Cascadia is using iLok for its authorization.
Masking
What is called “masking” occurs when two different signal sources are too close to each other in volume and frequency content. Typical phenomena of this kind occur when a pianist is to accompany a solo singer. If neither the instrumentalist nor the sound engineer are experienced enough, it can be a really boring experience – I have heard this countless times on live TV. The pianist is hammering away in the same frequency range as the singer, and perhaps also trying to drown out the vocals. An experienced producer can control the whole thing by partly arranging the piano accompaniment so that it is not exactly in the spectrum where we find the vocals. Of course, you can also demand that the pianist adopt a slightly more restrained playing style, which could leave room for the important vocals.
This problem also tends to rear its ugly head when adding a delay or reverb signal to an original signal. iZotope has previously introduced several plug-ins – Neutron, Nektar and Neoverb – that offer tools to deal with the masking problem. Neutron 5, for example, offers both Dynamic EQ and an Unmask function, but when it comes to the problem of the delay mucking up the input signal, Cascadia may be the perfect solution.
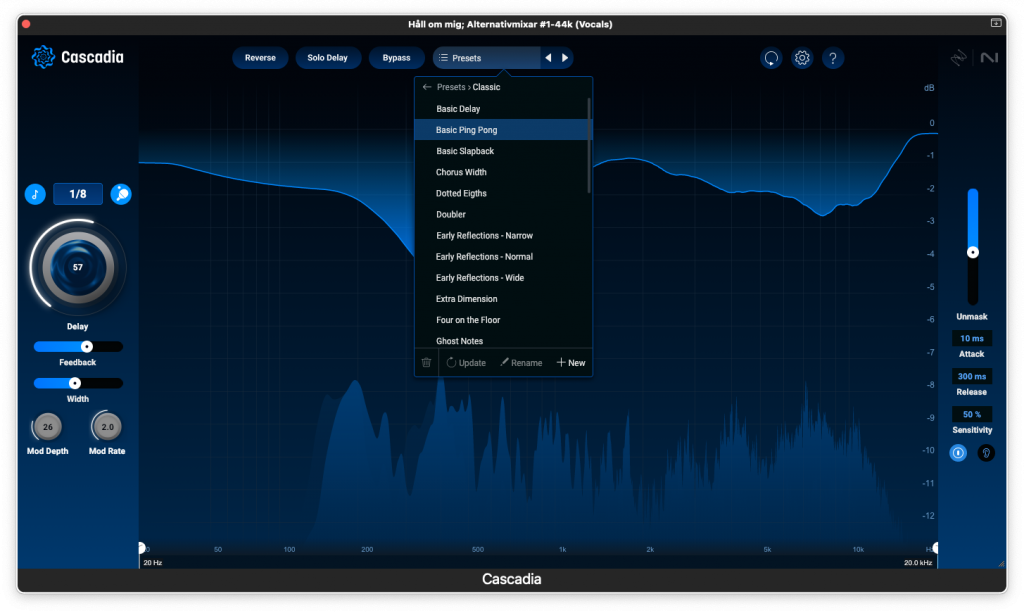
As a user, you are offered lots of good presets for iZotope Cascadia.
iZotope Cascadia
In Cascadia you don’t have to fiddle with complicated side chains and other things; all settings are accessible directly from within the app. Here you can easily create nicely bouncing delays, tight slapback echoes or other useful effects, without taking the focus off the vocal or instrument that should be in the driver’s seat for a single moment. Muddy mixes are a thing of the past.
The four main advantages of Cascadia are as follows:
Adaptive Unmasking Dynamically EQs the delay signal to keep the dry signal present.
Flexible Delays You can choose to sync the delay to your DAW, set a custom delay, use ping-pong effects, play the effect backwards, or give it a bit of a vintage pitch shift.
Intuitive Controls A very efficient interface with easy-to-understand controls.
Lots of useful Presets More than 50 professionally designed presets that include both spatial and more textural sounds.
A wonderfully simple and intuitive interface. The ping pong setting is symbolized by a table tennis racket and a ball. Clever enough!
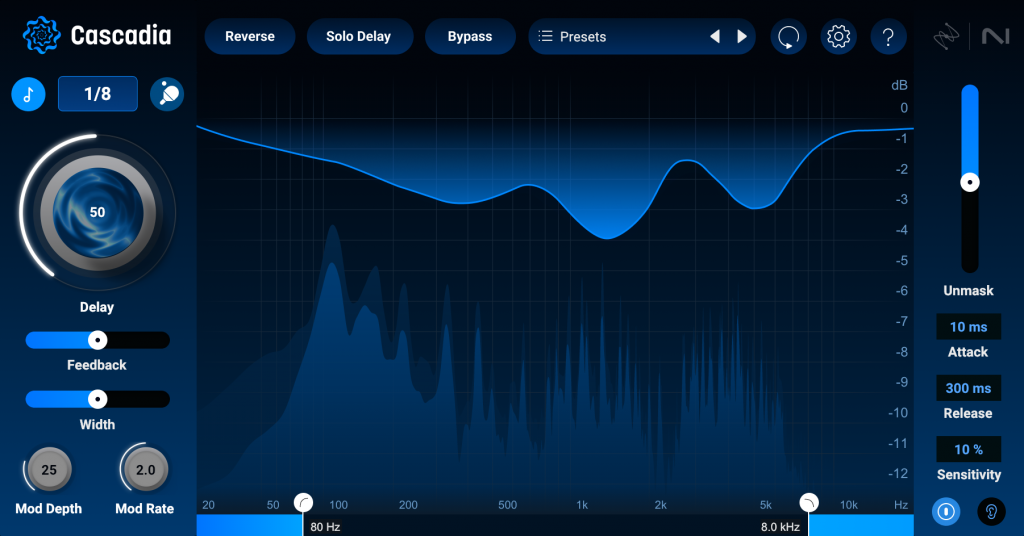
The User Interface
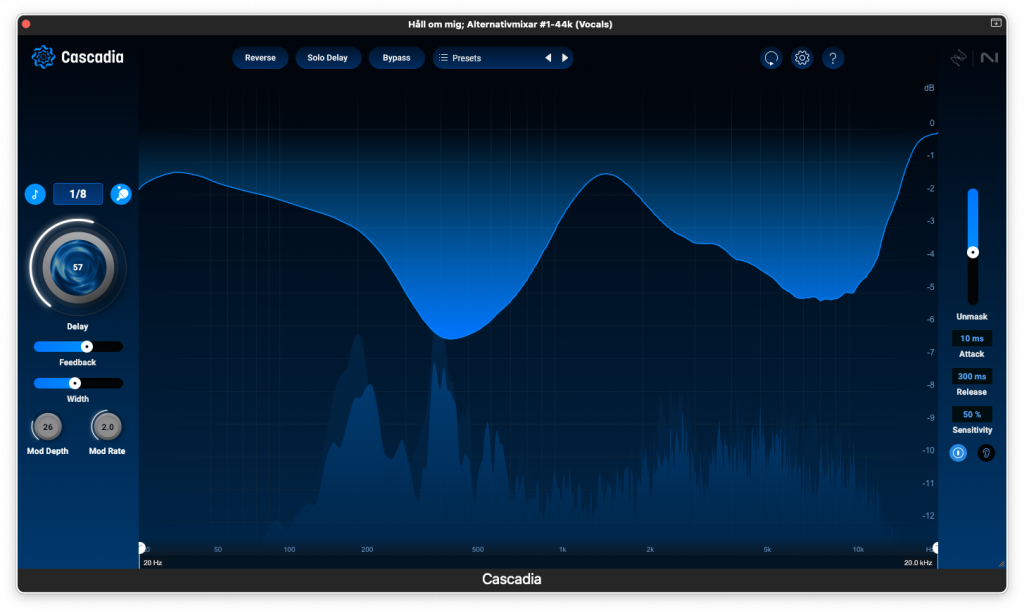
If we start by looking at the interface itself, most of it fits in one and the same window, which of course can be adjusted in size completely according to your wishes. At the top of the window there are buttons for the Reverse function, for “sunning” the Delay, for Bypass, and for selecting a preset.
Along the left edge you will find settings for syncing to DAW programs and in that case which time signature you want to use. There is also a button for selecting pingpong delay (it is illustrated with a table tennis racket plus ball – just such a thing), a large knob for the delay amount, two sliders for Feedback and stereo width, plus two knobs for modulation (depth and rate).
On the right edge of the image we find a slider for the amount of unmasking, plus settings for Attack Release and Sensitivity. There are also two buttons for Bypass and for listening only to the signal that is “masked” away. The rest of the window shows a combined frequency and level image of the signal, and at the bottom you can set the cutoff frequencies of the Hi- and Lopass filters. Everything feels incredibly intuitive. Just keep in mind that Cascadia is primarily designed to be used as an insert effect. If you want it in a tap (send/return), you should press the Solo Delay button and send it a generous signal.
What does it sound like?
Well, it sounds incredibly good. Neat and tidy, without being disturbed by any effects that crowd in. They are just there and lift and amplify the basic sound in a very exquisite way. Nothing in the delay effects crowd in or wants to be in the foreground. And it is incredibly easy to create a balance between the original signal and all possible effects.
As a user, we also have a rich selection of different effects and masterfully programmed presets to choose from.
I suggest that you click on the link below where the developers show what Cascadia sounds like and how it works.
Summary
iZotope’s Catalyst series contains three powerful effect plugins today. Plasma (saturation), Aurora (reverb) and Cascadia, with different delay effects. Unlike Ozone, Neutron and Nectar, the Catalyst series effects have a significantly simpler and more clear interface. However, this does not mean that they are in any way “simple” as effects. Quite the opposite! They are all three incredibly powerful and capable effects. We hope to be able to come back with tests on the other two in the Catalyst series, today it’s about Cascadia.
With Cascadia you can create delay effects that never get in the way of your most important audio tracks. Thanks to iZotope’s Spectral Unmasking technology, they have the ability to always stay just the right amount in the background. An incredibly intelligent delay effect, in other words.
Whether it’s nice, discreet slapback echoes, large, swelling delay cascades, or just a little bit of reverb, it always sounds clean and nice. No long effect tails are there to interfere with your, or others’, solo efforts. And you also have a lot of really useful preset settings to start from.
Your mixes will sound so much better with Cascadia in place among the effects plug-ins, and the soloists you’ve recorded – whether they’re vocal or instrumental – will be forever grateful that they can now shine in all their glory. Please send the developers at iZotope a thank you note when you receive rave reviews for your mixes in the future! I certainly will.
Links
Here we can read a little more about what “frequency masking” means:
● Mac: macOS Ventura 13.6.x, macOS Sonoma 14.4.x, macOS Sequoia 15.0; Compatible with both Intel and Apple silicon M-series Macs (native & Rosetta)
● Win: Windows 10 (22H2), Windows 11 (23H2)
Plugin Formats
● AAX, AU, VST3. All plugins 64-bit only.
Note: VST2 format is no longer supported.
Plugin Hosts
● Logic Pro 10.8–11, Pro Tools 2024, Ableton Live 12, Cubase 13, Nuendo 13, Studio One 6, REAPER 7, FL Studio 21, Reason 12.5, Maschine 2, Cakewalk by Bandlab, Audition CC 2024, Premiere Pro CC 2024
PRICE
Cascadia plugin for Mac and PC: 55 euros
Catalyst Series Holiday Bundle (From Nov 26–Jan 05)
Bundle with the other Catalyst Series plugins: 139 euros (includes Cascadia, Aurora, Plasma)